
Chapter 1 - Dynamics Telephony Introduction
1.1 The Application
Dynamics Telephony is a telephony wrapper for MS Dynamics CRM. The application hosts CRM web pages in browser style tabs and integrates telephony capability seamlessly for each tab.
Once the application is configured and installed, users can start to use Dynamics Telephony by launching the app on their desktops. The app appears like the browser version of MS CRM with an additional toolbar above it (as in fig 1.1 below).
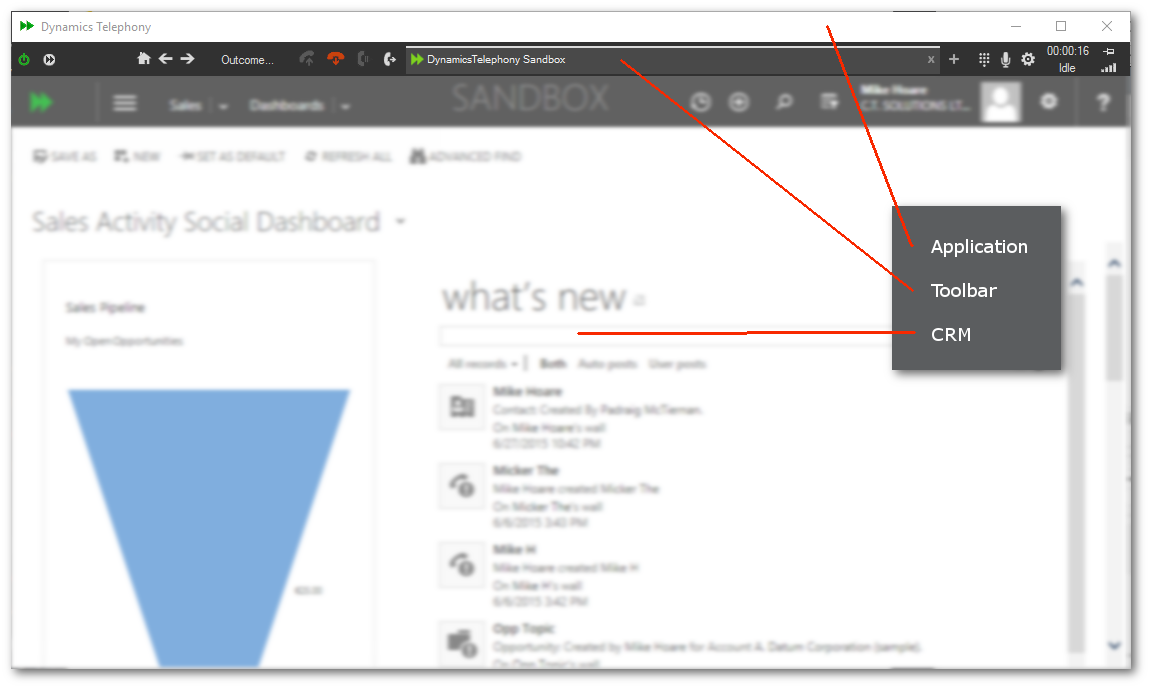
fig 1.1 The Dynamics Telephony App after startup
1.2 The Toolbar
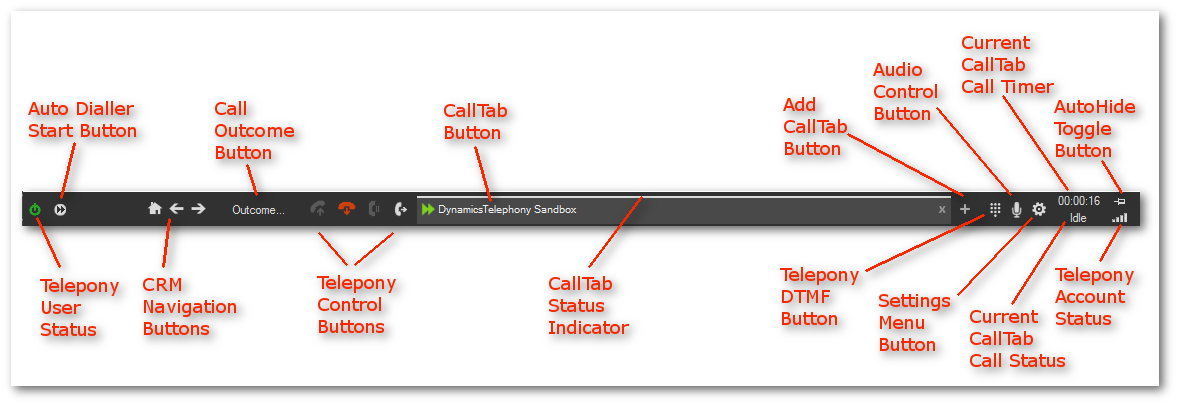
From the end users point of view, the toolbar is the Dynamics Telephony application. It allows users to make outgoing calls using the auto dialler and click to dial, and to receive inbound calls with screen pop’s. The main parts of the toolbar are shown below in fig 1.2 and a brief explanation of item in the following table 1.1. The additional auto dialler buttons will be discussed in the auto dialler section.
fig 1.2 The Dynamics Telephony Toolbar
|
Toolbar Element |
Description |
|
Telephony User Status |
This button shows the current user’s telephony status. Hovering over this button will display a list of options available to select. For some phone systems this will simply be on or off, but for others it will be more detailed. Depending on the option selected here, the User Status button will change color and irrespective of telephone system, the following behaviour will hold true.
If the User Status button is grey, the user is not logged in and will not receive calls. If the User Status button is red, the user is logged in, but will not receive calls. If the User Status button is green, the user is logged in and will receive calls.
Some examples of typical options for User status are listed below:
EG1. For AVAYA the most basic options will be:
Login Ready Not Ready Logout
There may also be a list of “Not Ready” Reason codes, explaining why an agent is not is a ready state.
EG2. For SIP a typical list of user status options might be:
Available Busy OTP Idle Away Brb Offline
Where OTP is “On the phone”, Brb is “Be Right Back”. Again there can be other options depending on the phone systems implementation. |
|
Auto Dialler Start Button |
To start an auto dialler session, select some contacts, leads, phone calls etc.. in the CRM and click Auto Dialler button. The Auto Dialler is explained in detail in the Auto Dialler chapter below, but a quick start example is shown below:
EG1. You want to call some “contacts”: Navigate the CRM to the list of contacts. Select the contacts you want to dial… Click the Auto Dialler button, and after a few seconds the Auto Dialler buttons will appear…
At this stage, you are ready to begin…
Using the dialler, you can:
Click the Play / Pause button to begin / pause dialling.
Click the Fast Forward Button to accelerate dialling, by moving the the end of the current call state (For EG to move from “Preview” to “Ringing” or to move from “Wrap” to the next contact) .
Stop the Auto Dialler Session and clear the queue, click Stop.
|
|
CRM Navigation Buttons |
The Navigation controls are the equivalent to an internet browsers Home, Back and Forward buttons |
|
Call Outcome Button |
The Call Outcome Button is used to set an outcome to a call. Users can select from a list of outcomes, which are normally customized for each customer / CRM instance. There are also some outcomes which are applied automatically when certain telephony event occur (No Answer, Busy and Error On Dial).
Hovering over the Call Outcome Button will display all available call outcomes. Clicking an outcome will select it as the outcome for the current call.
Different outcome buttons can result in different behaviour, for example some outcomes will close the underlying phonecall so as that call will not present to the agent again. Other outcomes may allow an agent to enter a date and time for the call to be represented to the agent etc… |
|
Telephony Control Buttons |
Answer, Release, Hold / Resume and Transfer telephony buttons are available to the user depending on the call status at any given time. For transfer to work the underlying phone system must support call transfer. |
|
CallTab Button |
CallTab’s are similar to tabs in a browser, except they contain phone call details as well as a CRM window for each tab. User’s will typically have several CallTab’s open at once. Some may be incoming calls, others may be outbound calls or click to dial calls. Click on a CallTab to select it, and the CRM and call data for that CallTab will be displayed.
To close a CallTab, click on the “x” at the right hand side of the CallTab. If there is an active call, the agent will be asked to complete the call before closing the CallTab. |
|
CallTab Status Indicator |
An Indicator above the CallTab will show the agent which CallTab is currently active. The indicator will be a solid strip, color coded as follows:
A white strip indicates the CallTab is idle and the call is finished.
A red strip indicates that there is a incoming call or a call on hold.
A yellow strip indicates a call in preview or wrap state.
A green strip indicates a call is ringing or a call is connected.
If there are active calls (Calls in any other state than idle (white Strip) above) on another CallTab, a flashing strip will appear over that CallTab to indicate the call status, colored in the same manner as shown above. |
|
Add CallTab Button |
Use the Add CallTab button to add a new CallTab. For Multi Tenancy sites, a list of available CRM’s will pop-out when hovering over this button, and the agent can select the CRM from this list. For incoming calls, a new CallTab will be created automatically for the call and there is no need to add one manually. |
|
Telephony DTMF Button |
Use the DTMF button to inject Dial Tones into the active call. For EG if the agent connects with an IVR system, they can use this feature to enter “1” for main menu, “2” for sales etc… The underlying phone system must support DTMF injection for this feature to work. |
|
Audio Control Button |
The Audio Control button allows convenient access to the PC’s audio levels and inputs. Agents can setup the microphone and volume levels here and can also switch audio inputs. This is particularly useful for systems that use the PC with a headset for telephony operations. This button will not appear if access to the windows audio system is prohibited or unavailable. |
|
Settings Menu Button |
The Settings menu is explained in detail in the Settings section of the Dynamics Telephony Administrator's Manual. Depending on system configuration Settings Menu items may or may not be visible to the Agent. |
|
Current CallTab Call Timer |
The Call Timer displays the time in state for the current CallTab. |
|
Current CallTab Call Status |
The Call Status Label display the Call State for the Current CallTab |
|
AutoHide Toggle Button |
The AutoHide Toggle switches between auto-hiding and fixing the Dynamics Telephony Toolbar. Similar in operation to the windows taskbar auto-hide option. |
|
Telephony Account Status |
The Account Status indicates the state of the Telephony connection. If there are problems with the telephony system or the network connection it will be reported here. |


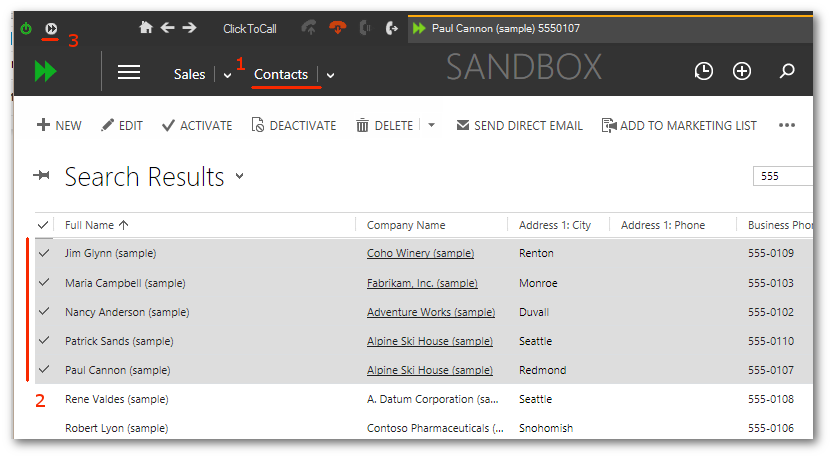
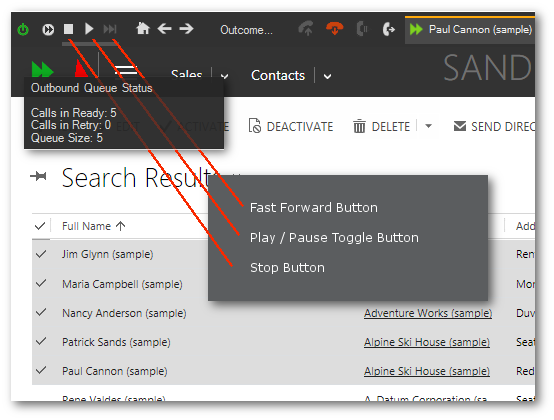

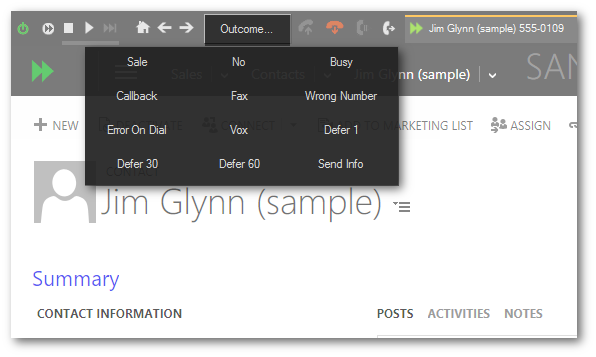


table 1.1 Dynamics Telephony - Toolbar
1.3 Telephony Operations
1.3.1 Make Call / Release Call
In the following chapters we will cover making calls with click to dial, incoming screen pop and the auto dialler, but below we will demonstrate making a quick call with by entering a number. Once the app is configured and telephony is working correctly we should be able to dial easily enough. Hover over the Call / Transfer button and a popout form will appear, enter a number in the text box and hit return or click the Dial button (see fig 1.3.1.1 below)
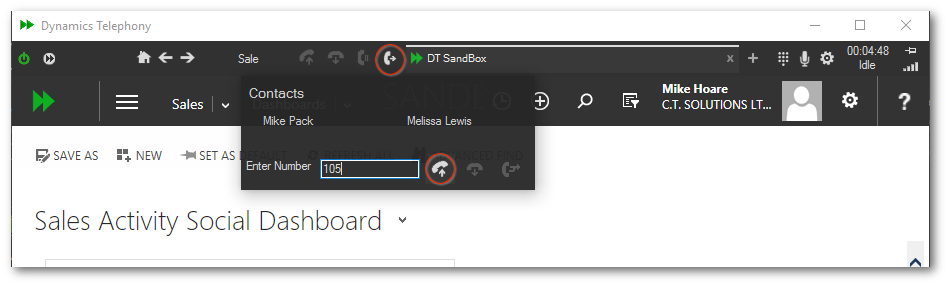
fig 1.3.1.1 Making a call - enter a number and click return
Once the button is clicked, the app will change to reflect the call in progress, the calltab indicator will show green, the call status text will show “ringing” and the call timer will start counting up (fig 1.3.1.2).
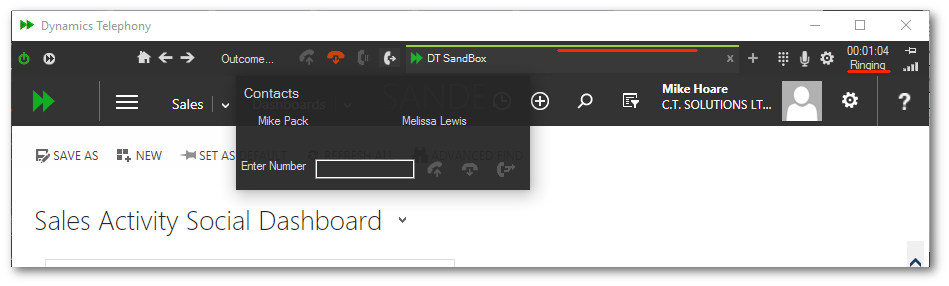
fig 1.3.1.2 Making a call - Call in “Ringing” state
If and When someone answers the call, the call status will change to “Talk” and a new call timer will start counting up (fig 1.3.1.3). Also some buttons that were previously disabled will light up. Specifically the Release and Hold / Resume buttons. The release button (in red) will release or hang up the call, the hold resume button will toggle between Talk and Hold call states.
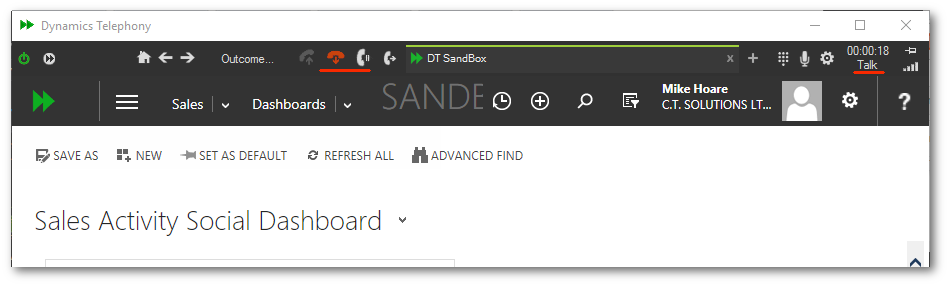
fig 1.3.1.3 Making a call - Call in “Talk” state
Once finished conversing with the other person on the line, click the release button to end the call (fig 1.3.1.4). Now the release and hold resume buttons are disabled again as these options are only available when there is an active call on the calltab. We can also note the color of the calltab indicator has reverted (to the configured forecolor), the call status text reads “Idle” and the call timer reset and started counting up.
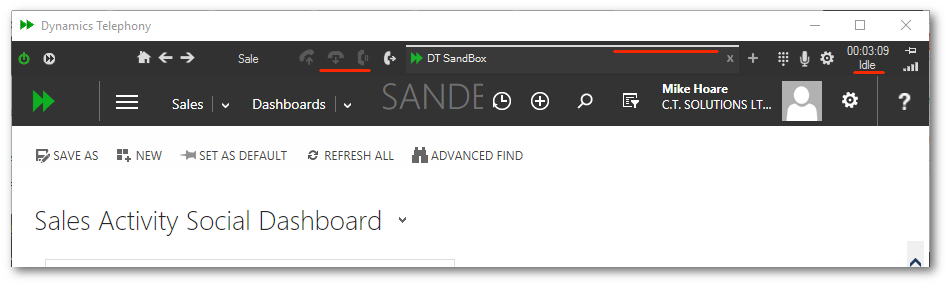
fig 1.3.1.4 Making a call - Call in “Idle” state
The above call flow and toolbar changes above are indicative of almost all calls when using Dynamics Telephony. There are some additional telephony features which will come into effect with some calls and these are outlined below.
1.3.2 Hold / Resume
An agent may wish to put a call on hold for various reasons during a call and may do so by clicking the hold / resume button. When a call is in the “Talk” state the hold / resume button displays a small phone handset with a pause symbol (fig 1.3.2.1) clicking on the button in this state will put the call on hold.
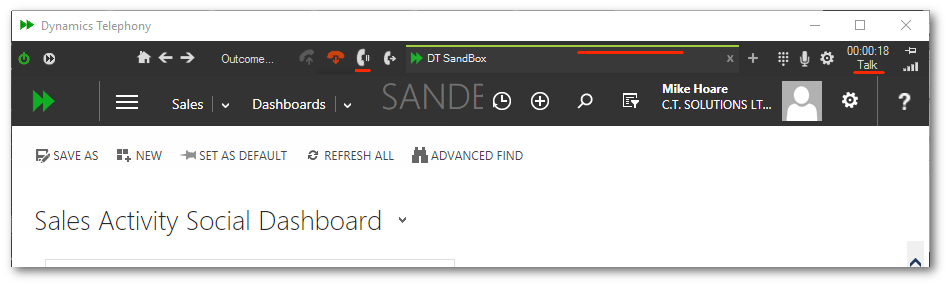
fig 1.3.2.1 Putting a call on “Hold”
After clicking the hold / resume button the call will be placed on hold. When a call is in the “Hold” state the hold / resume button displays a small phone handset with a play symbol (fig 1.3.2.2) clicking on the button in this state will put the call back in the Talk state again (fig 1.3.2.1).
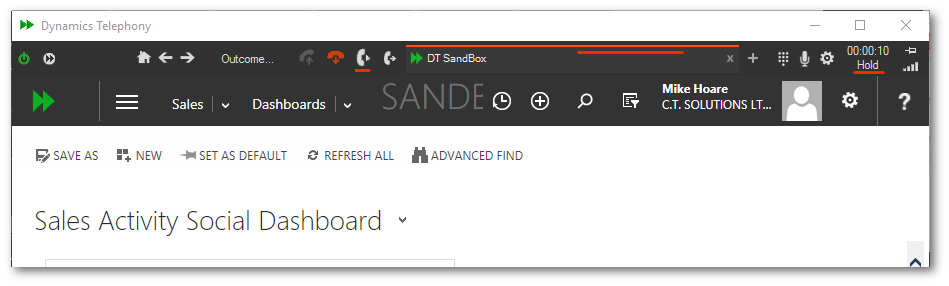
fig 1.3.2.1 Resuming a call on “Hold”
1.3.3 Transfer / Consult Transfer
Dynamics Telephony supports transfer and conference calls assuming the underlying phone system does, which is the case with most phone systems nowadays. To transfer a call on the current calltab, there must be an active call in place(see 1.3.1 above). Hover over the Call / Transfer button and the popout form will appear, enter the number to transfer the call to in the text box and hit return or click the Dial button (see fig 1.3.3.1 below)
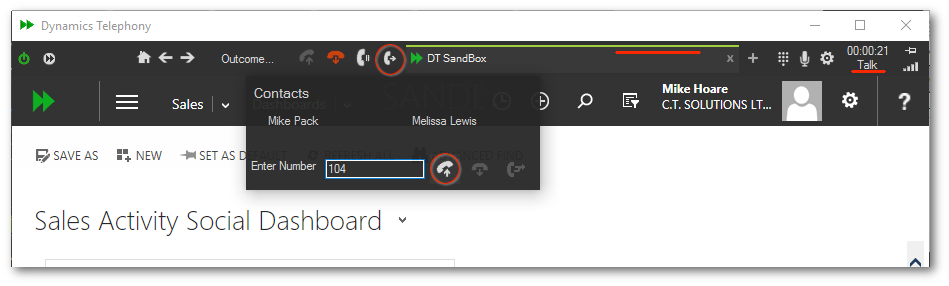
fig 1.3.3.1 Transfer a call - Initiate transfer
After clicking the dial button, a new calltab will be created and receive focus for the new call, the existing call will be placed on hold. Initially the new call will be in “Ringing” state (fig 1.3.3.2). It is possible to complete the transfer at this stage (A blind transfer as the user will not know if the other party will answer the call or not) or the agent can wait until the other party answers the call and can spend a little time explaining the purpose of the call before completing the transfer (A consult transfer). Either way the transfer is completed by clicking on the transfer button (circled in fig 1.3.3.2).
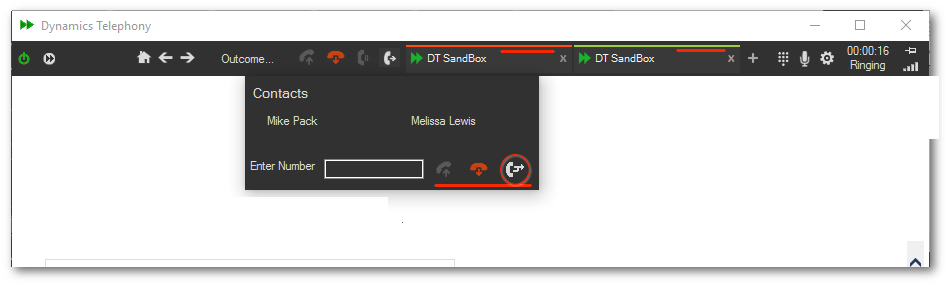
fig 1.3.3.2 Transfer a call - Consult
After clicking the transfer button, the transfer completes and both calls are released. At this stage the agent should close the calltab created for the transfer as in fig 1.3.3.3.
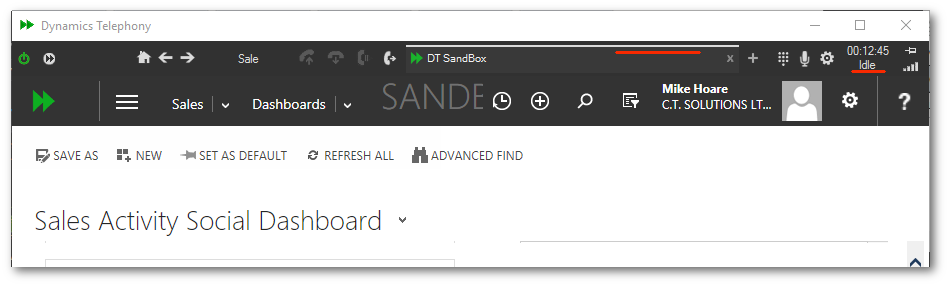
fig 1.3.3.3 Transfer a call - Complete
1.3.4 Drag and Drop Transfer / Conference
Dynamics Telephony also supports drag and drop transferring and conferencing of calls. To transfer via drag and drop, you must drag a call in “Talk” to a call on “Hold”. Simply drag the CallTab of the call in Talk over the CallTab with the call on hold and drop to complete the transfer. A popup as shown in fig 1.3.4.1 will appear when the call is ready to be transferred.
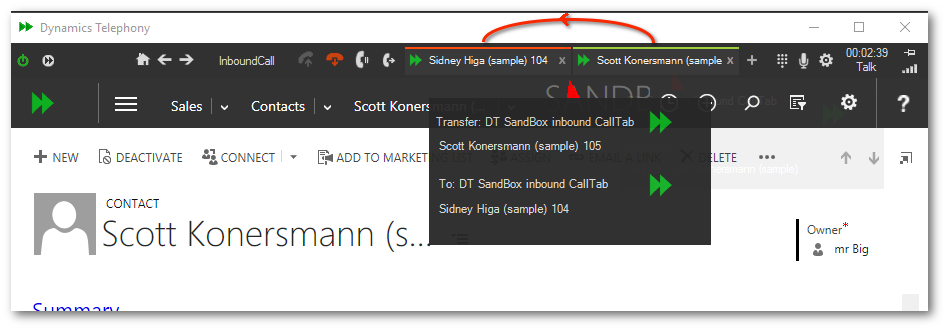
fig 1.3.4.1 - Drag and Drop Transfer
To conference, hold down the CTRL key while performing the drag and drop operation. The popup is this case will indicate a conference instead of a transfer (fig 1.3.4.2), otherwise the operation is the same.

fig 1.3.4.2 - Drag and Drop Conference
Chapter 2 - Click To Dial
Click to Dial is available with Dynamics Telephony from MS CRM 2011 Roll Up 12 onwards. Before it can be used in the app, the feature must be turned on in CRM Settings, Administration, General Settings. This process, which requires system administration access to the CRM, is explained in more detail in the the Dynamics Telephony Administrator's Manual.
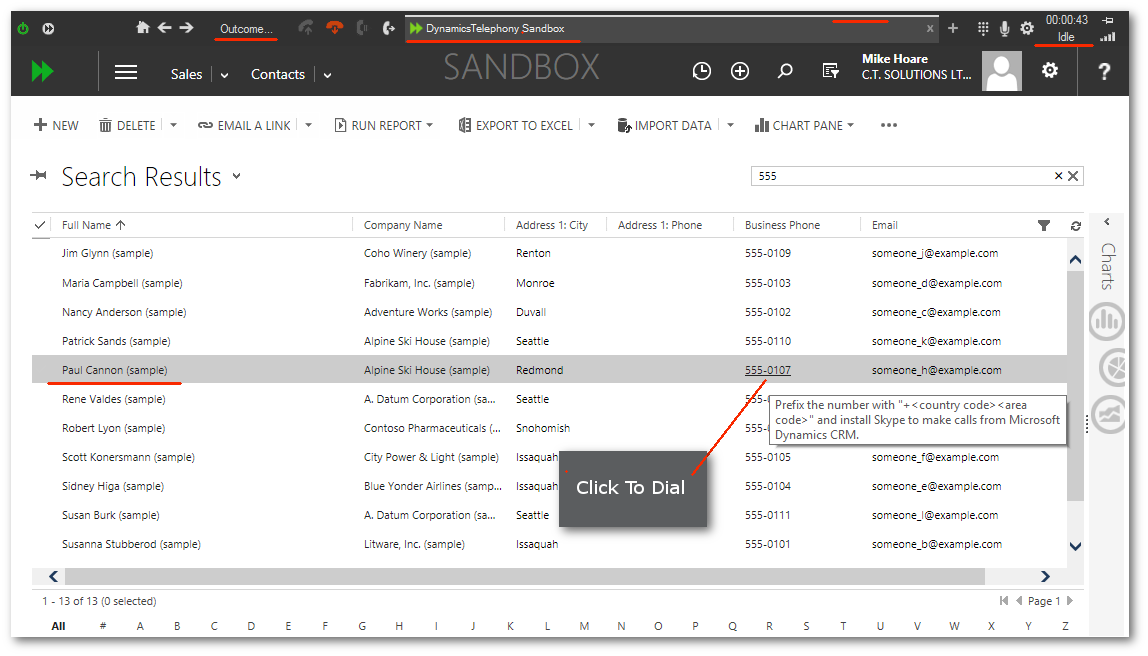
fig 2.1 Click to Dial - Start…
Once the feature is switched on, agents can use Click to Dial by clicking on any phone number anywhere in the CRM. An example shown below sees an agent click a number on from a list of contacts. The areas underlined in red show where various changes will take place as a result of clicking the number.
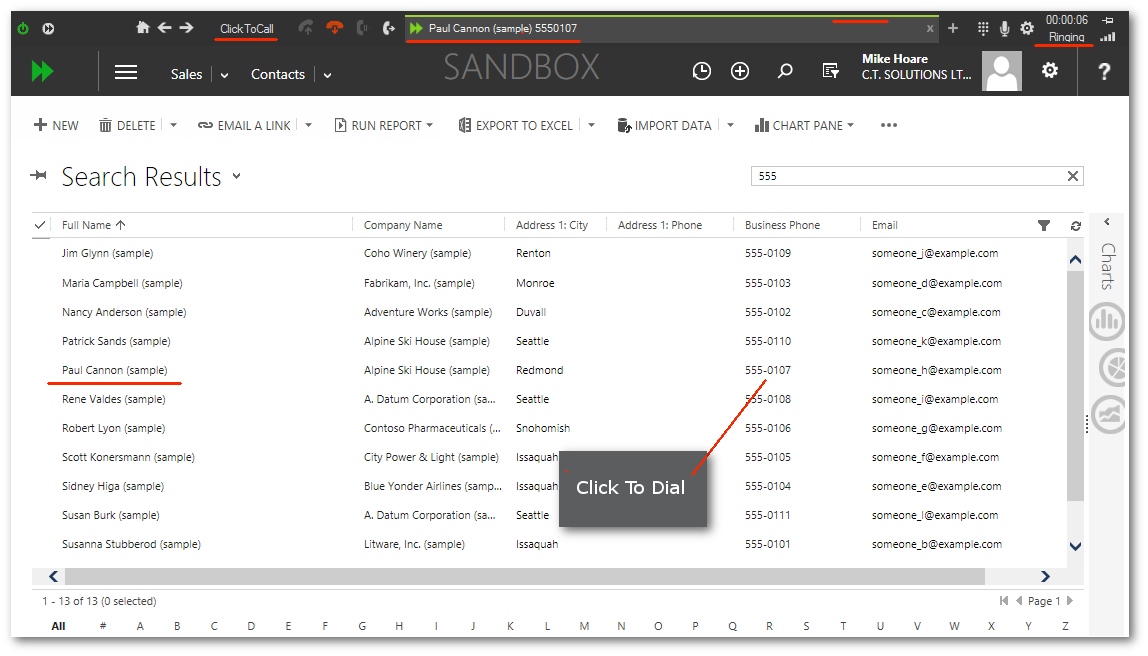
fig 2.2 Click to Dial - In progress...
Once the number is clicked, the Call Outcome changes to “ClickToCall”, the CallTab indicator changes color to green and the call status changes to “Ringing”. Initially the CallTab text will display the number being dialled, while the app interrogates the CRM for the entity being dialled. After a slight delay the CallTab will change again to reflect the Name and Number being dialled.
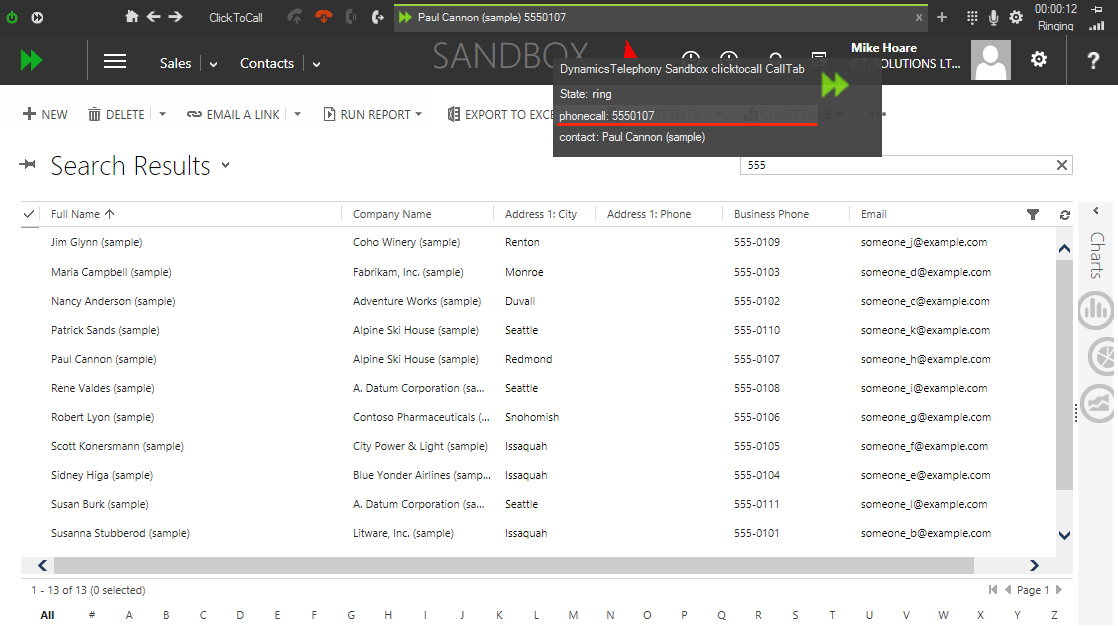
fig 2.3 Click To Dial - Hover over CallTab and select phonecall activity...
Once the name and number are displayed it is possible to use the CallTab to navigate to the phonecall activity or the click to dial entity (in our example the contact Paul Cannon (Sample)). This option to navigate to the activities / entities of any type of call, will always be accessible by hovering over a CallTab assuming the data is available.
Click on the phonecall activity and the phonecall activity created for the call is displayed…

fig 2.4 Click To Dial - Display phonecall activity...
To select the “To Party” of a call, in our case the contact Paul Cannon (Sample) hover over the calltab...
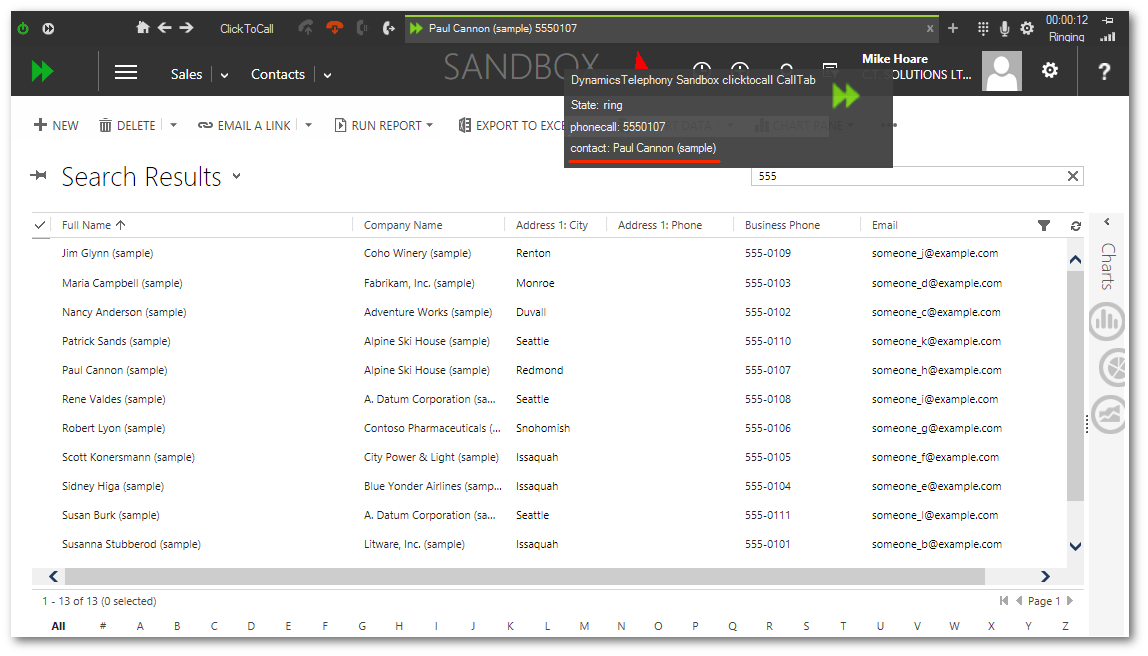
fig 2.5 Click To Dial - Hover over CallTab and select To Party...
...click on the contact and the form is displayed…
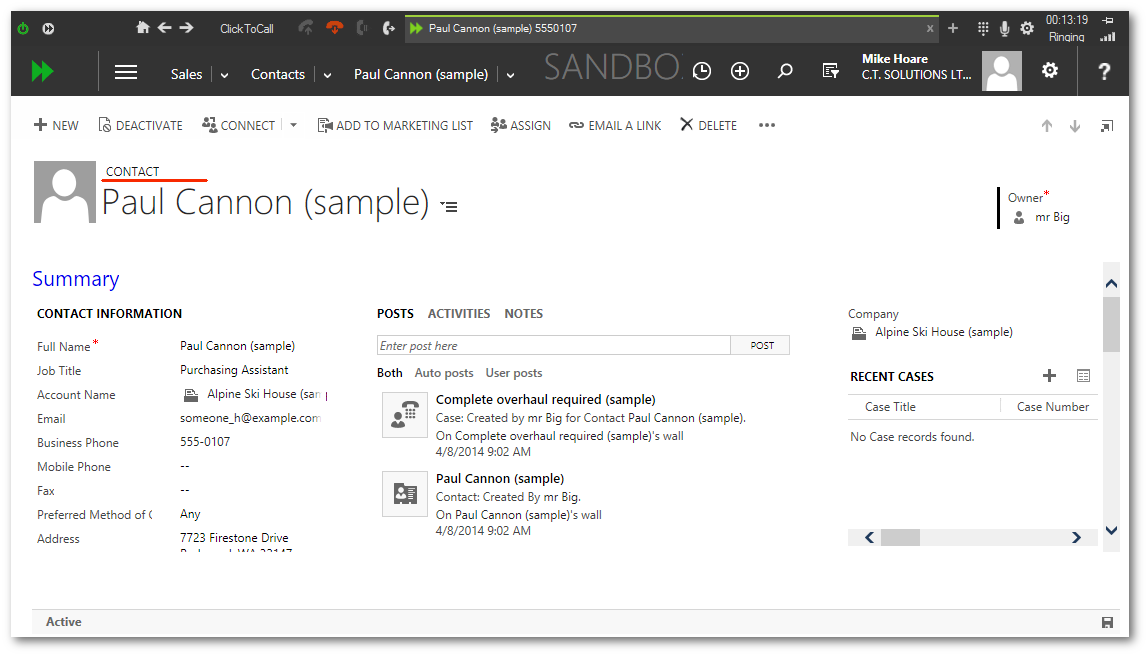
fig 2.6 Click To Dial - Display “To Party”...
Once the agent has finished his conversation and call is released, the CallTab indicator will change color from green to yellow and the call status text will change from “Ringing” or “Talk” to “Idle”. At this stage the call is completed and the application will update the phonecall activity and the “To Party” with the call details. In our example, clicking the activities tab of our contact, we can see the new phonecall activity added by the application.
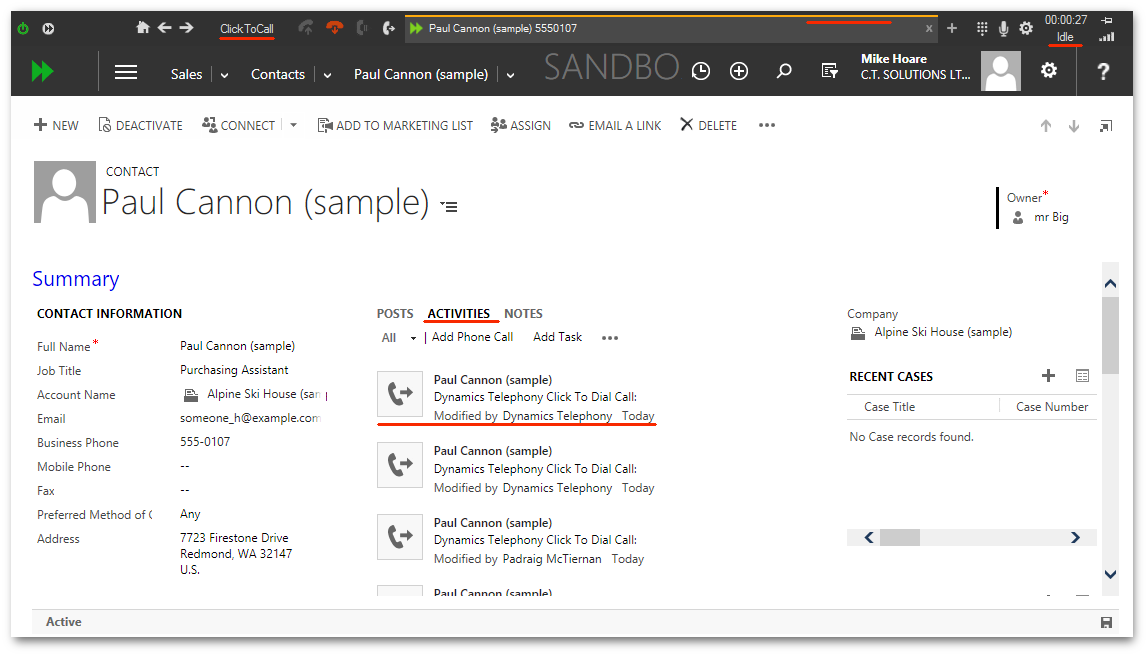
fig 2.7 Click To Dial - Post Call - Activities
Similarly, clicking the notes tab we can see that a note has been added with the details of the call.
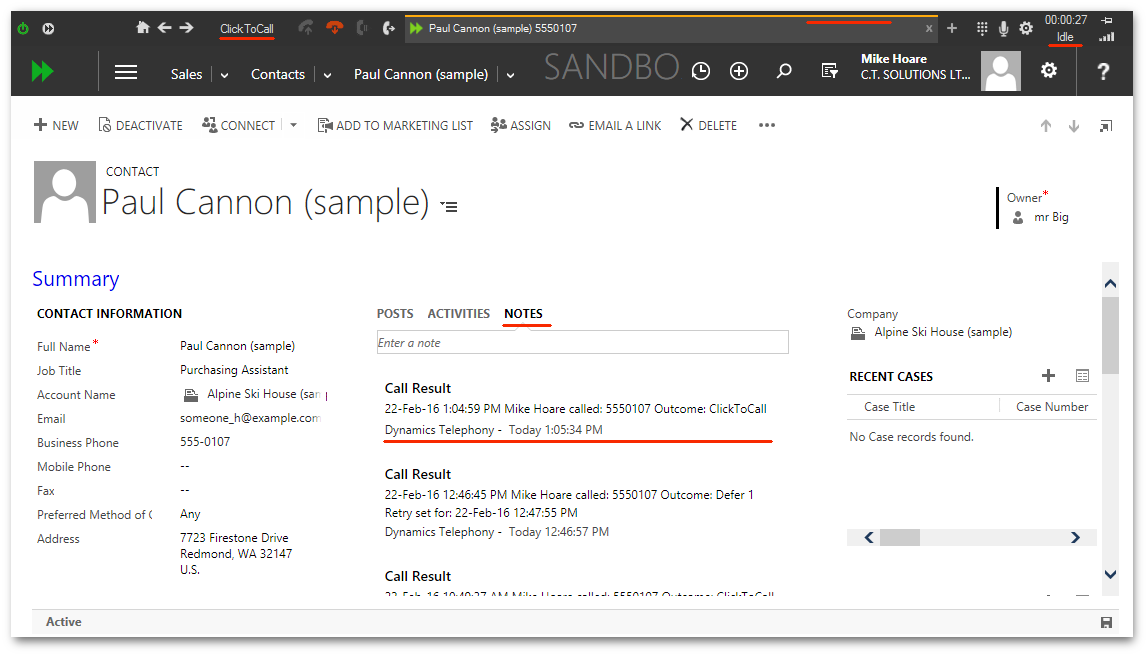
fig 2.8 Click To Dial - Post Call - Notes
That’s really all there is to know about Click To Dial, in the next section will will discuss Inbound Screen Pop.
Chapter 3 - Inbound Screen Pop
Inbound screen pop is standard for all versions of Dynamics Telephony. For all incoming calls, the application will attempt to match the number to entities in the CRM.
By default Dynamics Telephony will search the “contact” and “lead” CRM entity types for a match. This is configurable and is discussed in more detail in the Dynamics Telephony Administrator's Manual.
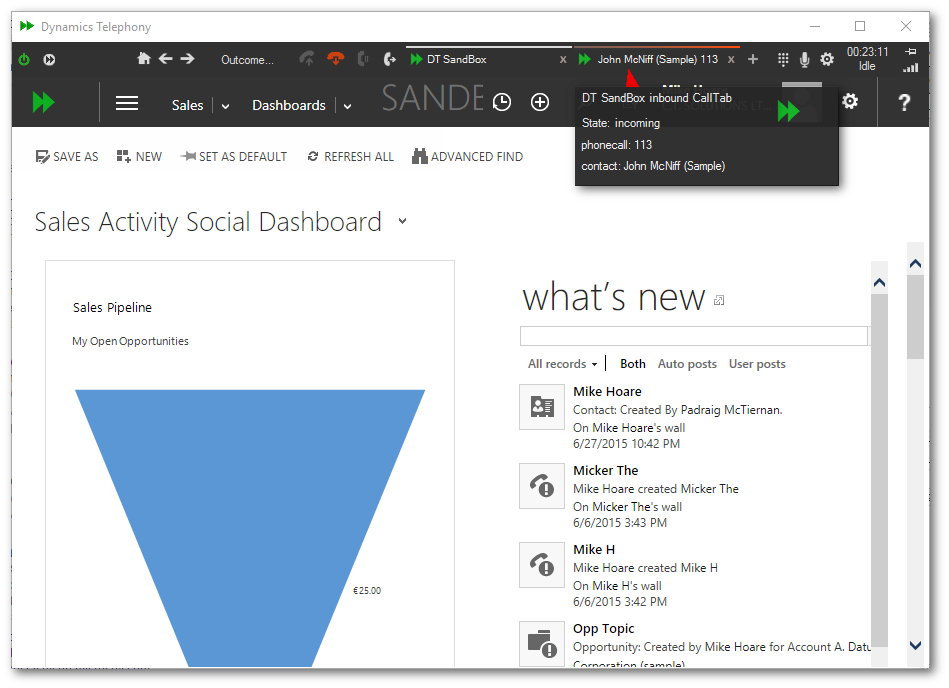
fig 3.1 Inbound Screen Pop with a single match
When an incoming call arrives, a new CallTab is created and the CallTab Indicator will begin flashing red, and a pop-up will display any available information about the call as shown in Fig 3.1.
The current CallTab will stay active allowing the agent to decide whether or not to respond to the incoming call.
To answer the call, the agent can click on the CallTab or any matching item on the pop-up list.Clicking an item on the pop-up list will navigate to that item in the CallTab. At the very least, there will be a “phonecall” item on the pop-up as the application will create this activity for the call.
3.1 Inbound Screen Pop - Single Match
If only one matching item is found, the application assumes it is correct and it will select this item automatically. The underlying phonecall activity created for the call will be updated using the matched entity as the “From Party” of the phone call. Clicking on the CallTab will answer the call and the matching CRM entity will be displayed. For example, the incoming call in fig 3.1 shows a single match for an incoming phone call. The match is a contact with the name “John McNiff (Sample)”. Clicking on the CallTab in this instance will result in the call being answered and the contact “John McNiff (Sample)” being displayed in the CRM window of the CallTab as shown in fig 3.2.
Clicking the CallTab gives it focus and in the case of an incoming contact, will answer the call. Now that the call has been answered and the CallTab has focus, the CallTab indicator will display solid green, the Call Outcome button will display “InboundCall” and the call status should read “Talk”.
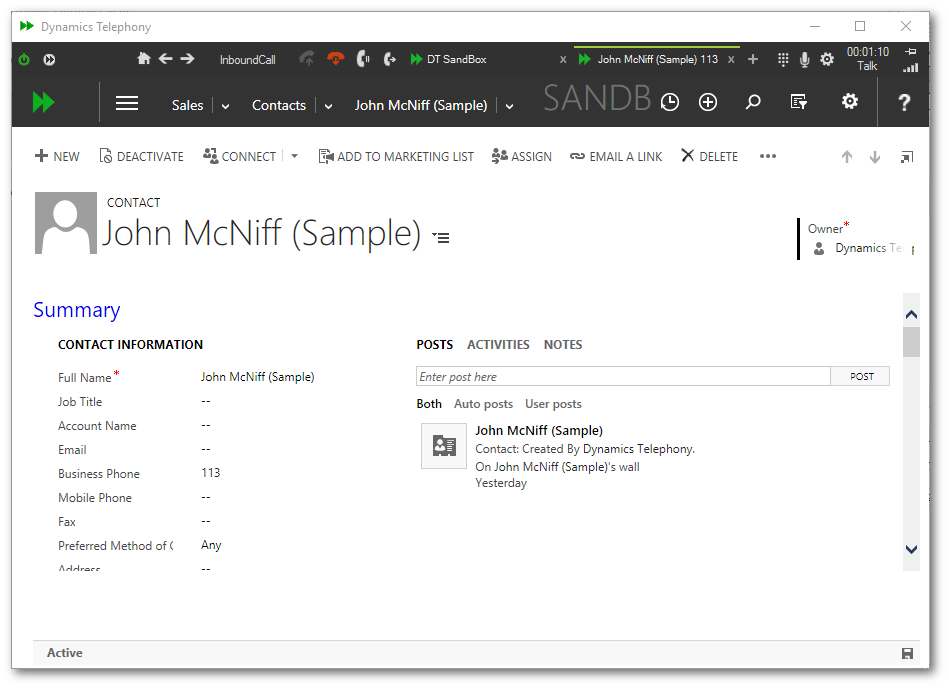
fig 3.2 Inbound Screen Pop - Single Match - Talk
Now the agent is free to perform whatever actions are needed while talking to the client on the other end of the call. When finished, the agent or the other party will release the call. At this point the CallTab indicator will change color from green to yellow and the call status text will change from “Ringing” or “Talk” to “Idle”. Now that the call is completed the application will update the phonecall activity and the “To Party” with the call details. In our example, clicking the activities tab of our contact, we can see the new phonecall activity added by the application in fig 3.3. A note will also be added similar to the click to dial example in fig 2.8 in the previous chapter.
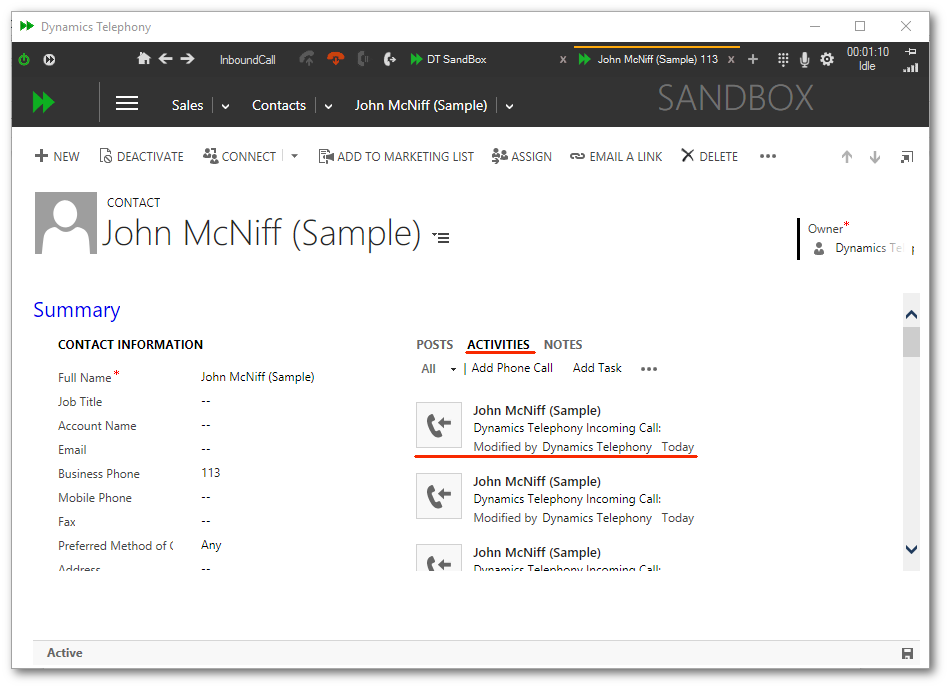
fig 3.3 Inbound Screen Pop - Single Match - Post Call
3.2 Inbound Screen Pop - Multiple Match
If more than one match is found, a list of matches is presented to the agent. The agent can click on the relevant one from the list to answer the call and navigate to that entity. If the agent is unsure which match is the relevant one, they can click on the CallTab to answer the call, and then after talking to the client, can decide which matching item to select.
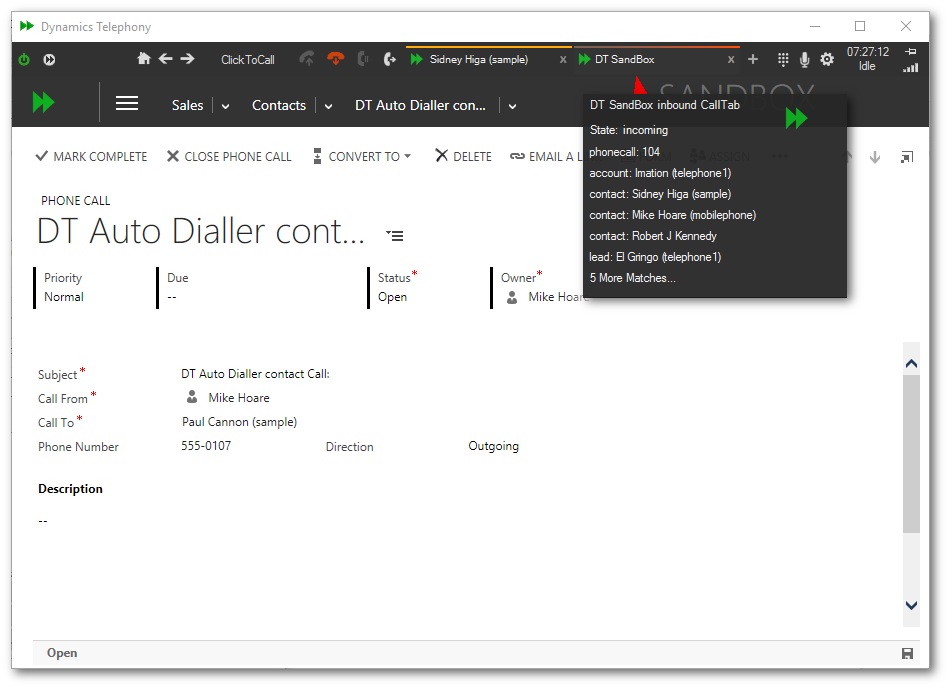
fig 3.4 - Incoming Screen Pop - Multiple Match.
3.3 Inbound Screen Pop - No Match
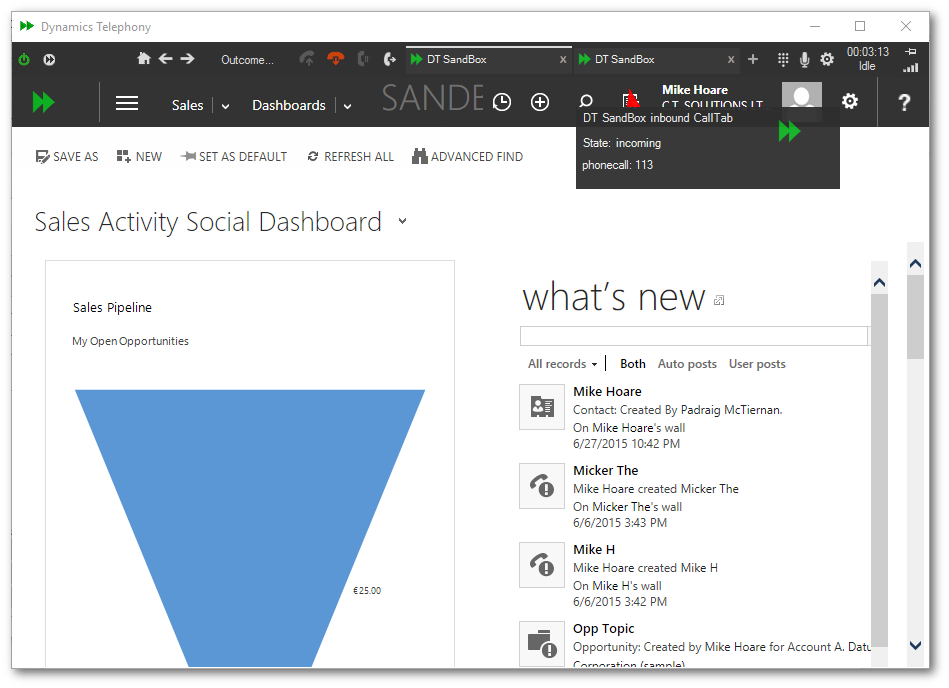
fig 3.5 - Incoming Screen Pop - No Match.
If no match is found, the application can display the “phonecall” activity created for the call or depending on the configuration create and display a blank entity (lead, contact, case etc…). This configuration is discussed in more detail in the Dynamics Telephony Administrator's Manual. In the example shown in fig 3.5 the application is set to simply show the phonecall activity when there is no match on an incoming call (This is the default behaviour). As we see in the incoming notification, there is no matching items. Clicking on the CallTab answers the call and displays the phonecall activity for the call. Agents call manually fill in the “Call From” attribute of the call, create a new entity (lead, contact etc…) by clicking the “+” button on the CRM nav bar, or go about doing any other relevant work in the CRM.
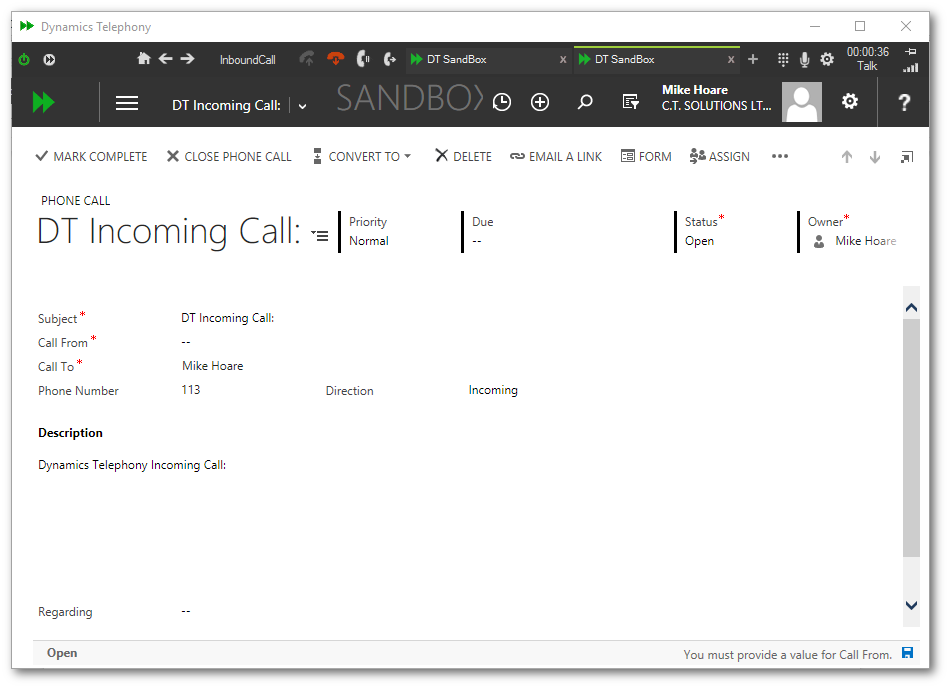
fig 3.6 - Incoming Screen Pop - No Match - PhoneCall Activity
In the next example below in fig 3.7 / fig 3.8, the application is configured to create a new “lead” when there is no match on incoming. The popup notification on receiving a new call will show this lead as in fig 3.7. The agent can click on it to …
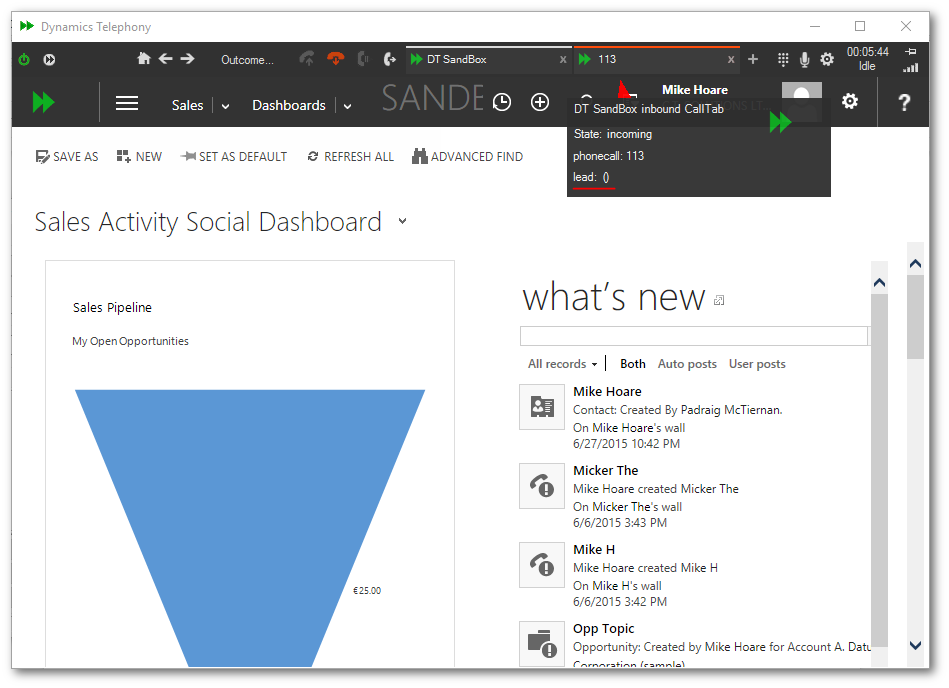
fig 3.7 - Incoming Screen Pop - No Match - create new “lead”
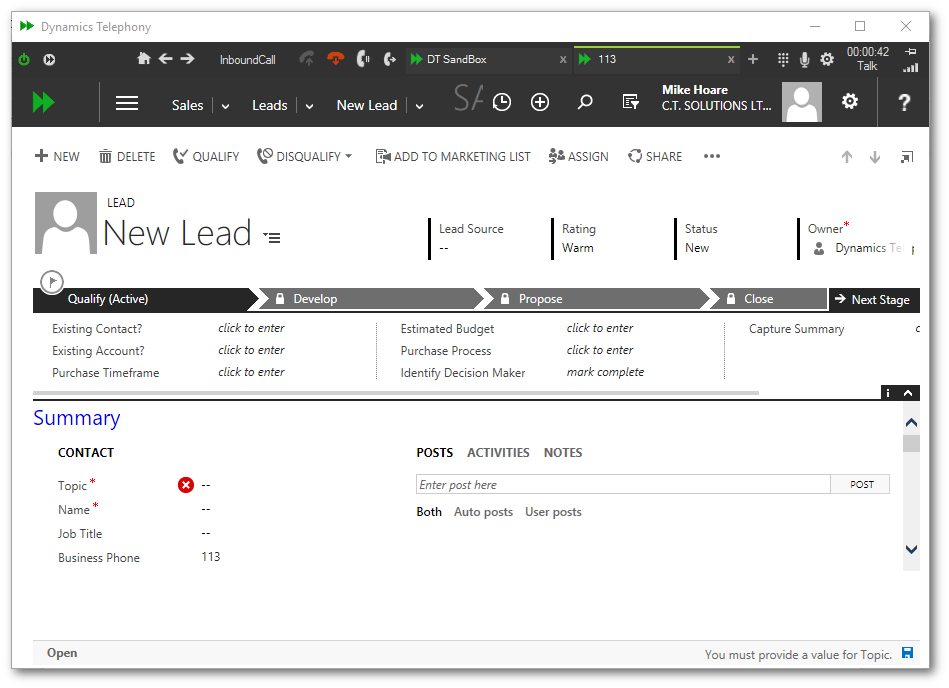
fig 3.8 - Incoming Screen Pop - No Match - new “lead”
...display the lead and answer the call. The agent is then free to fill out the form and perform the work required. That is about all there is to Inbound Screen Pop. Next chapter will explain the Auto Dialler.
3.4 Inbound Screen Pop - DNIS
DNIS Inbound Screen Pop works much the same way as regular inbound screen pop except that depending on the number dialled by caller, the application will display customized CallTabs to the agent. The name given to the dialled number in the telecoms industry is the “Dialled Number Identification Service” or DNIS, which is the term we will be using for the remainder of this section.
Dynamics Telephony allows supervisors / administrators to set up a list of DNIS numbers which are color coded with a logo and a label description. The label text will most likely contain the actual DNIS number or a description to help the agent identify the probable purpose of the call. For example if a marketing campaign placed an advert with a number to dial for more information, this number might be DNIS’d to allow agents to recognize the call is relating to this marketing advert.
The creation and maintenance of these settings is discussed in detail in the Dynamics Telephony Administrator's Manual and the agents need only familiarize themselves with the color, logo and label for each DNIS entry.
When a new inbound call comes into the agent, Dynamics Telephony will lookup the calls DNIS number against the list of DNIS numbers configured. If it finds a match, the application will use the colors, logo and label text from the match to create a new CallTab (see fig 3.9). If no match is found, the default CallTab settings are used. The following example demonstrates DNIS.
An Inbound call finds a DNIS match and a new CallTab is created based on settings for that match…
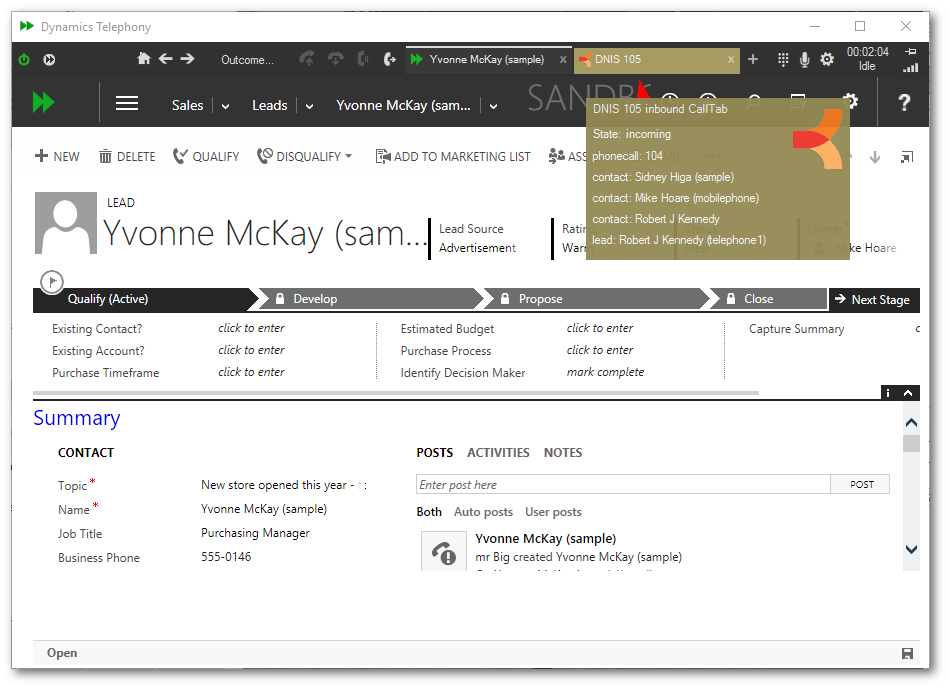
fig 3.9 Inbound Screen Pop with DNIS - Incoming
The Agent answers the call and carries on working as normal, noting the DNIS match from the color, DNIS label and logo of the new CallTab presenting the call...

fig 3.10 Inbound Screen Pop with DNIS - Talk
Once the call is released, the agent can update the CRM etc… When finished, hover over the “x” button at the right hand side of the calltab to close as usual...
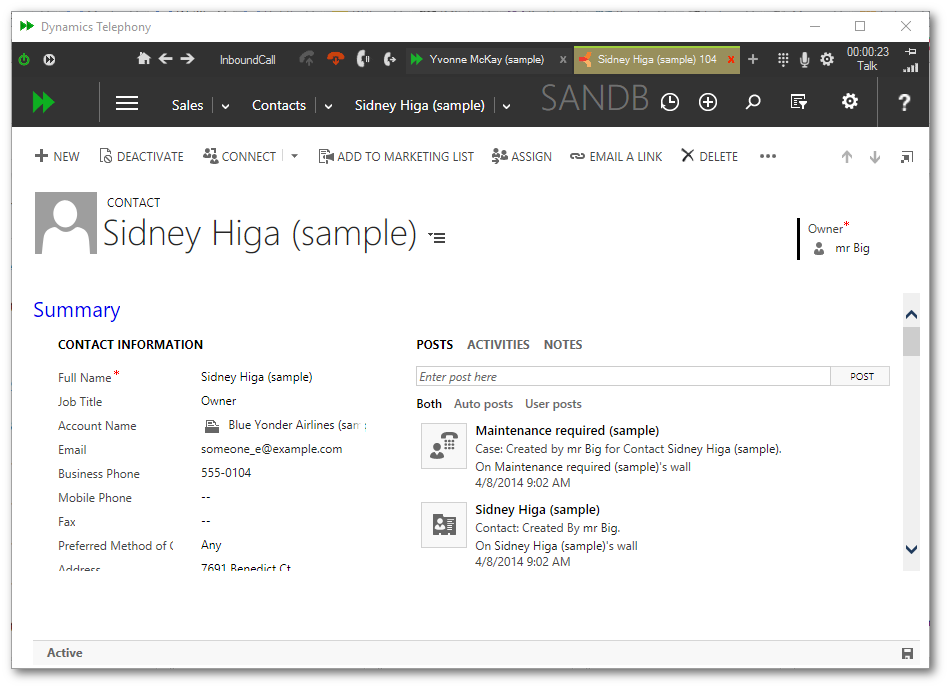
fig 3.10 Inbound Screen Pop with DNIS - Idle
Clicking “x” closes the calltab and we are back where we started...
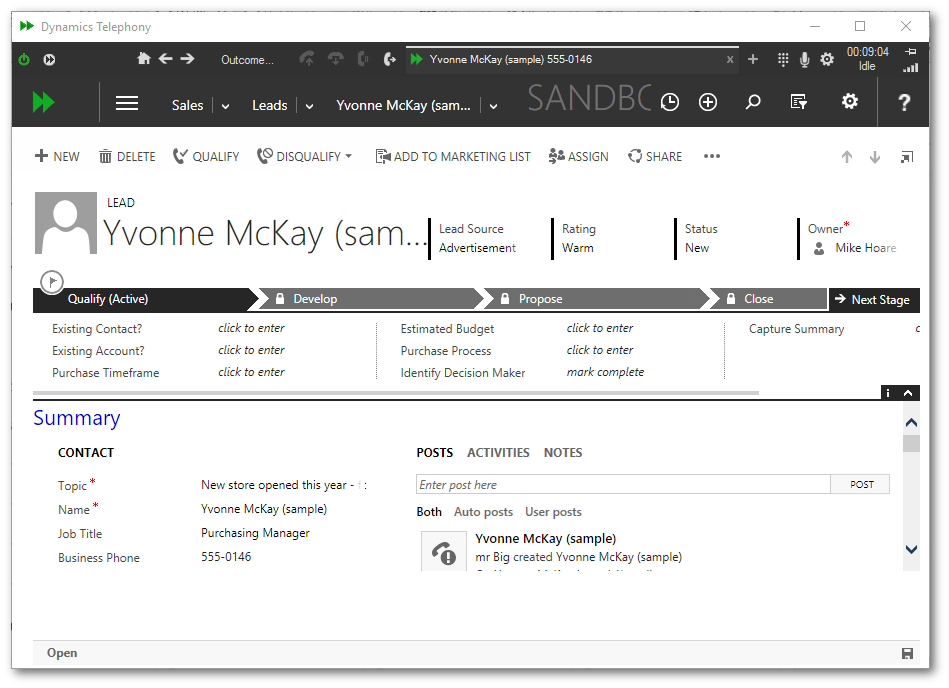
fig 3.11 Inbound Screen Pop with DNIS - After Close
That is about all there is to know about inbound screenpop, the next chapter will discuss the Auto Dialler.
Chapter 4 - The Auto Dialler
4.1 The Auto Dialler Call Flow
The Auto Dialler will take a selected list of entities or activities (leads, contacts, accounts, phonecalls etc…) and dial each one automatically in turn. The call flow for the auto dialler (shown in fig 4.1) shows each stage during this process. Here is a summary of each stage in the process.
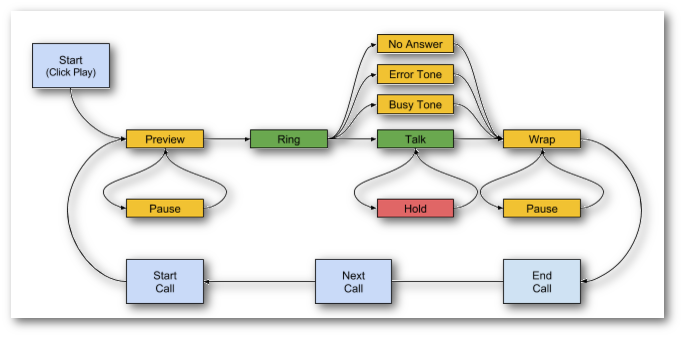
Fig 4.1 - Auto Dialler - Call Flow
Preview: Preview time allows the agent to get familiar with the details of the forthcoming call. In Dynamics Telephony, preview time is set to 20 seconds by default, but this value along with other auto dialler settings can be changed in the Dynamics Telephony Administrator's Manual. The application will count down the preview time, displayed on the toolbar Call Timer. When the countdown reaches 0, the call will be dialled and the “Ring” stage begins.
Ring: Once the call is dialled a countdown timer to wait for the call to answer begins (Default 30 seconds). If the call is not answered during this countdown, the dialler will release the call and set a “no answer” outcome against it and the call flow will proceed to the next stage. If the called number is busy, the call will not proceed and a “busy” outcome will be set and the call flow will proceed as above. If the called number results in an Error on Dial tone, the call will set a “eod” outcome and proceed above. If the call is answered within the no answer time, the all will proceed to the “Talk” stage.
Talk: Once the call is connected the talk stage begins. The agent and client will converse and eventually the call will end, which will put the call in the “Wrap” stage.
Wrap: Once the call is finished, the application gives some time to the agent to finish the work at hand (updating / creating entities, notes etc…). By default wrap time is set to 30 seconds. Once the wrap countdown is completed, the call is ended and the application will write its own records, look for the next call in the queue and start the next call by putting it in the “preview” stage, and the cycle continues.
Pause / Hold: As is shown above there are some other stages that may or may not be used. During the Preview and Wrap stages an agent may click the pause button on the toolbar to enter the “Pause” stage if they need more time. Also during the talk stage, an agent may place a call on hold (“Hold” stage) if required before resuming to the “Talk” stage. These are optional stages that an Agent may use when more familiar with the application.
4.2 An Example - Auto Dial “My Open Leads” 1.2.3.
Probably the best way to show how to use the auto dialler is with an example. A typical need for an agent may be to dial all open leads assigned to him/her…
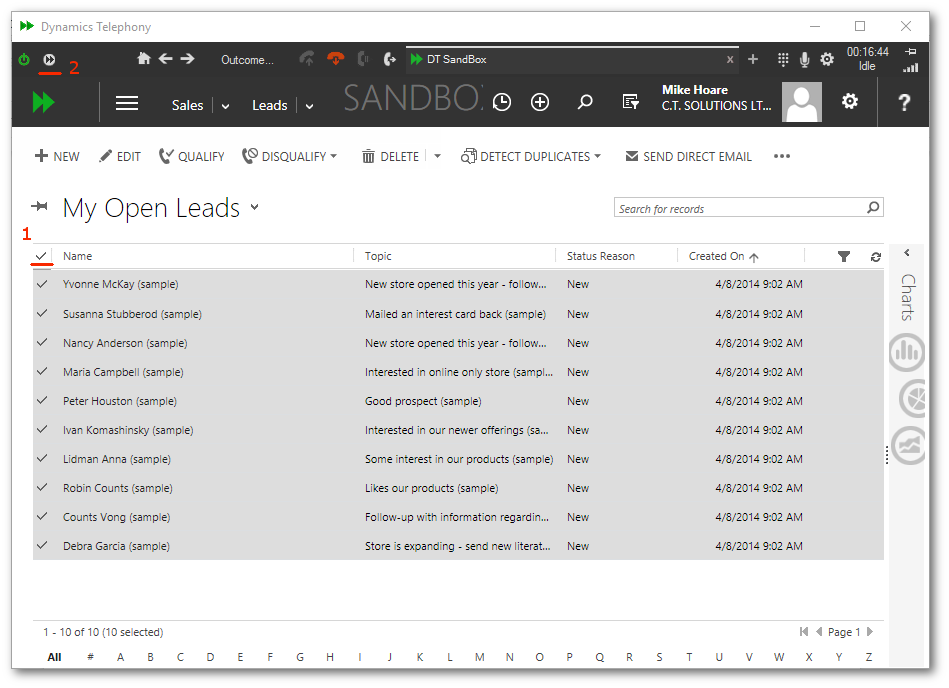
fig 4.1 An Example - Auto Dial “My Open Leads” 1.2...
To begin the agent navigates to the “My Open Leads” view as normal to view these leads. Then click on the “select all” checkbox (1) on the top left of the grid showing the leads. Once selected the agent clicks the applications auto dialler button (2). After a few seconds, the dialler buttons will appear. To start dialling the agent simply clicks the “Play” button (3).
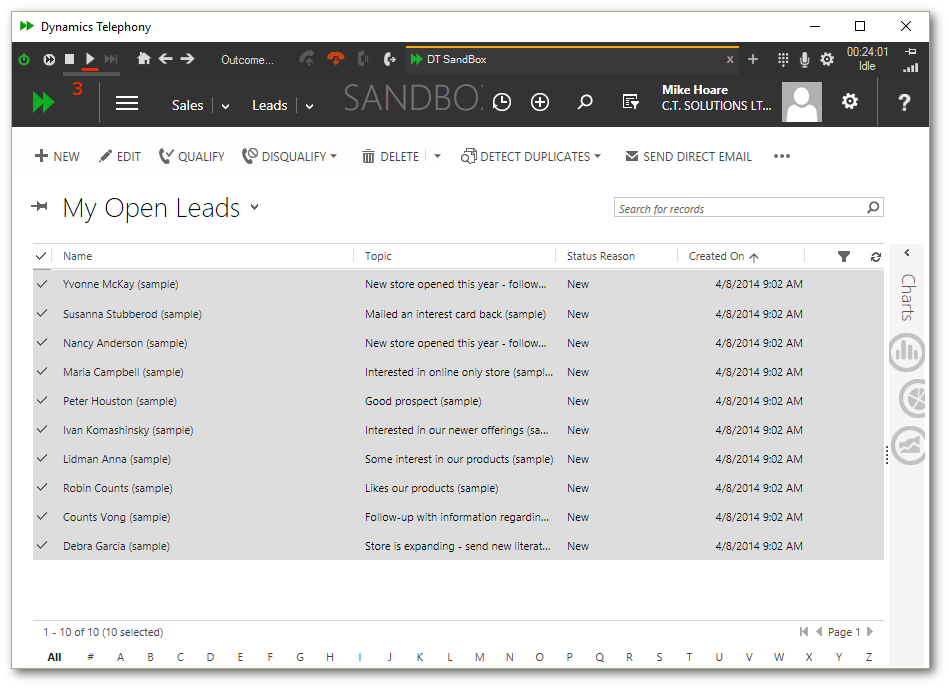
fig 4.2 An Example - Auto Dial “My Open Leads” ...3.
4.3 Using the Auto Dialler
Now that we have loaded some leads, we can “play” them. The dialler will follow the call flow in fig 4.1 and start the first lead in “Preview” time. Preview time will display as a countdown on the right hand side of the toolbar. As the clock counts down agents should familiarize themselves with the data in the CRM window, in this case a lead shown in fig 4.3.

fig 4.3 Using the Auto Dialler - Preview
Apart from the countdown call timer, the call status text will change to “Preview” and the calltab indicator will change to the preview color. During preview, the agent can click the play / pause button to pause the countdown if more time is needed to preview the data in the CRM window. Clicking the button again will out the agent back in preview and the countdown will begin again. Also during preview, if an agent feels there are ready the fast forward button will skip the remaining countdown time and progress the the next (ring) stage. Note as well the telephony buttons are all disabled during the preview stage as there is no active call in place yet. This will change when the call enters the ringing state.
Transitioning from preview to ring state (fig 4.4 below), the call indicator changes to the ringing color, the call status text changing to “Ringing” and a new countdown starts in the call timer representing the configured (by the system administrator)“no answer” time. Notice that the play / pause button is now disabled as we cannot pause a call in a live state (ringing, talk, hold). Also the telephony release button has been enabled as there is now an active call and it can be released if needed.
If the countdown timer reaches 0, the call will automatically be given a “no answer” outcome. Wrap time (see below) is installation dependent and may or may not be configured for this outcome. Any updates will then be sent to the CRM, the next call will be loaded and the cycle will begin again.

fig 4.4 Using the Auto Dialler - Ringing
As the cycle continues the application is back in preview displaying the next lead in the queue (fig 4.5).

fig 4.5 Using the Auto Dialler - Back in Preview
This time the call is answered and the agent transitions to the Talk state (fig 4.6 below), the call indicator changes to the talk color, the call status text changes to “Talk” and the call timer starts counting up to measure the talk time. Notice that the play / pause button is again disabled as we cannot pause a call in a live state (ringing, talk, hold). Also the telephony release and hold / resume buttons has been enabled as there is now an active call and it can be released or placed on hold if needed.
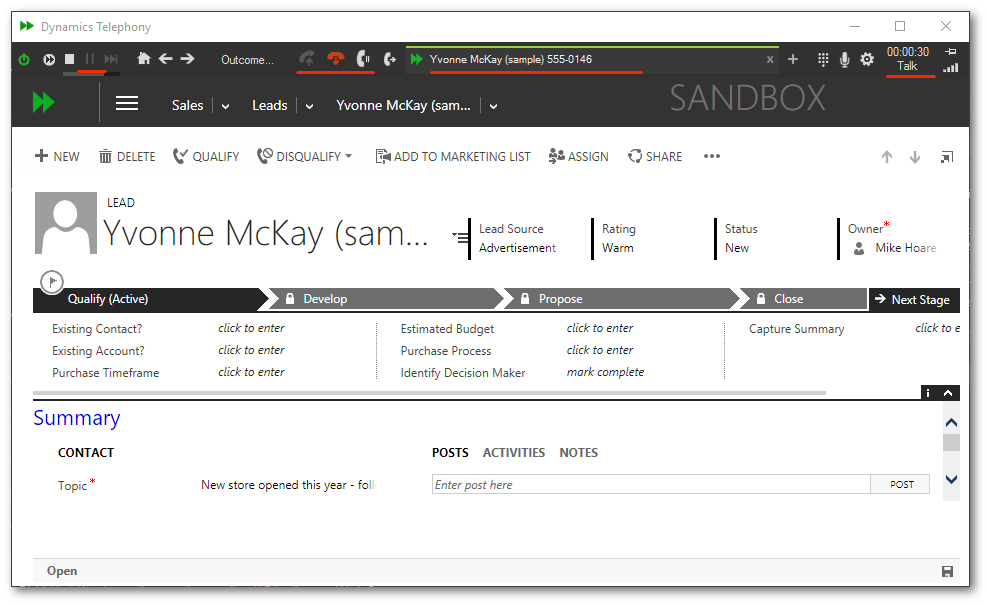
fig 4.6 Using the Auto Dialler - Talk
As this call was answered, no automatic outcome will be applied and the agent will be required to select an outcome after talking to the other party. To view available outcomes, hover over the outcome button and the list will popup (fig 4.7 below). To select an outcome, simply click on it. Depending on configuration the outcome may or may not release the call automatically. If it does not the agent simply clicks the release button when ready.

fig 4.7 Using the Auto Dialler - Select an outcome
Again depending on configuration, wrap time may or may not be present at the end of the call. Assuming it is (as in fig 4.8 below) the application will transition to the wrap state to allow the agent time to update any crm data before the end of the call.
Once in Wrap state the call indicator changes to the wrap color, the call status text changes to “Wrap” and the call timer starts counting down the remaining wrap time. Notice that the play / pause button is available again in case the agent needs additional time to “Wrap” the call. Also the telephony buttons have been disabled as there is no longer an active call.
At the end of wrap time the application writes the call results to the CRM and continues the cycle by selecting the next call and transitions it into preview time.
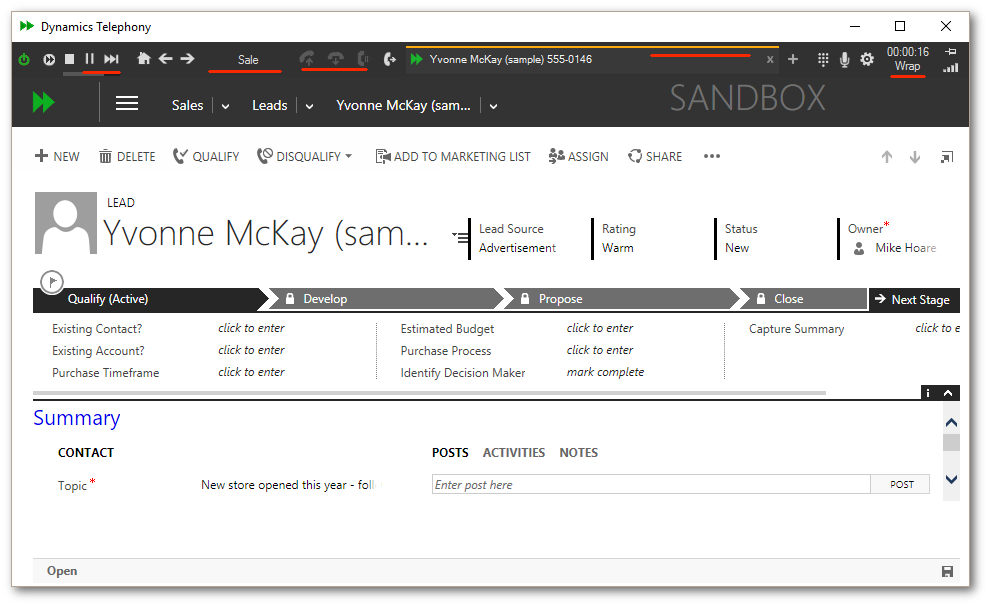
fig 4.8 Using the Auto Dialler - Wrap
4.4 The Agent Dashboard
Dynamics Telephony provides several default reports and dashboards. One of these is the Agent Dashboard that is part of the client application. This tool allows an agent to monitor progress of the queue being worked on. The utility will allow the agent to view 3 charts shown in fig 4.9.
The first of these is a line and bar chart called the “Call Flow”. This chart allows the agent to gauge the speed at which the queue is being negotiated. Several metrics are present here including call rate, call connection rate, call completion rate, queue size remaining and projected burndown to an empty queue.
The second chart on the dashboard is the “Call Results” pie chart which shows a breakdown of the results obtained to date running the current queue.
The third chart and final chart on the dashboard is the “Work Time” pie chart which gives the agent a breakdown of state times to show the agent where most time has been spent.
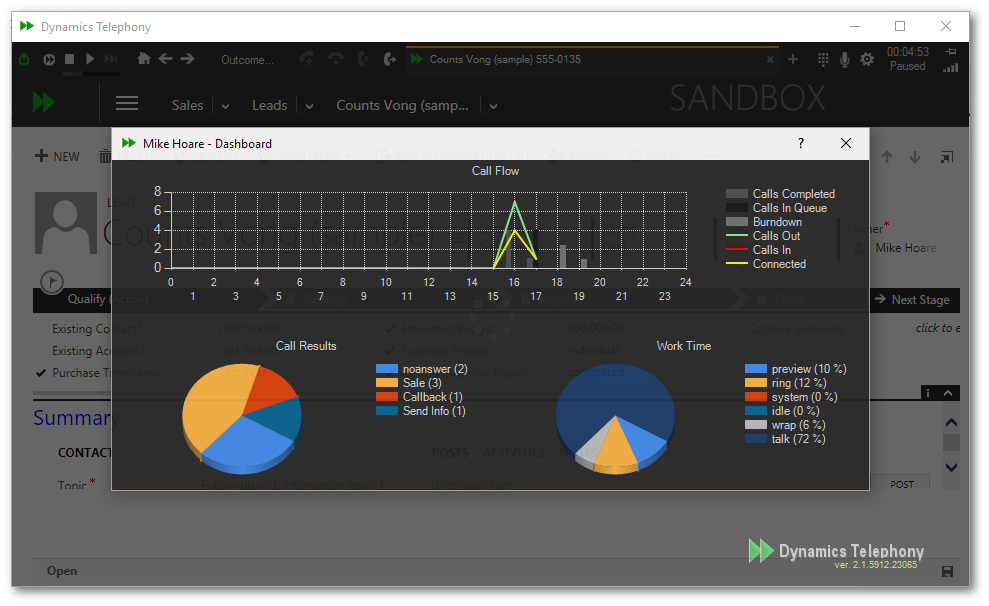
fig 4.9 The Agent Dashboard
The purpose of the Agent Dashboard is to let the agents check their own performance and fine tune certain actions as they see fit to optimize productivity. To view the agent dashboard, hover over the settings menu button and click on “Agent Dashboard” option as shown in fig 4.10. Access to Agent Dashboard is configurable and may not always be available or visible as an option.
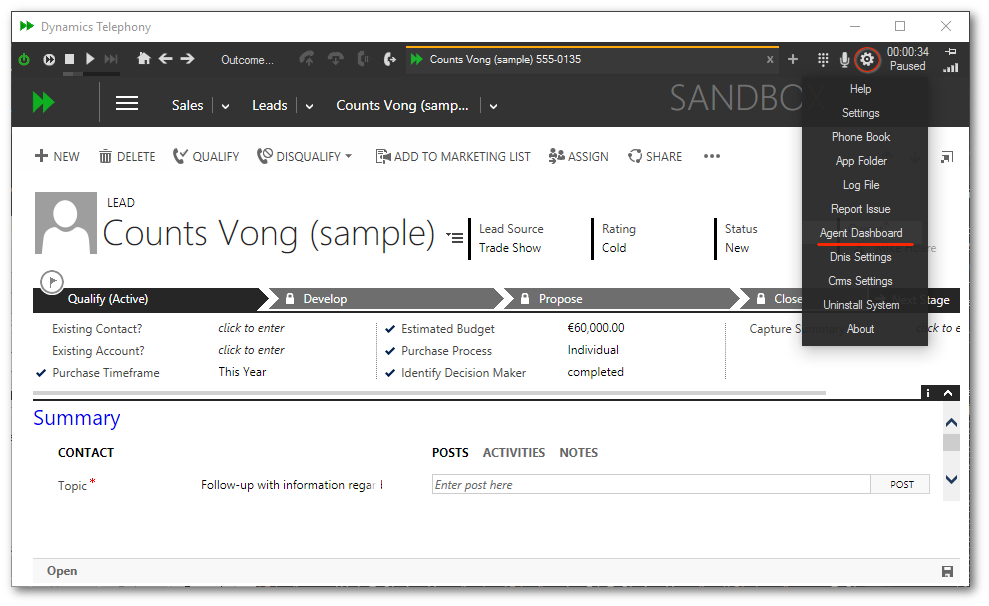
fig 4.9 Agent Dashboard
Chapter 5 - Auto Dialler with CRM Queues (CRMQs)
Dynamics Telephony can also integrate with Dynamics CRM Queues. In this instance the application will look for queue items to work on from Queues configured to work with Dynamics Telephony. The configuration of queues is discussed in detail in the Dynamics Telephony Administrator's Manual. Once setup Queues will then supply activities to dial, and the application will display the to party entity and dial the number given for the activity. The call flow for the auto dialler with CRM Queues integration (shown in fig 5.1) shows each stage during this process. Here is a summary of each stage in the process.
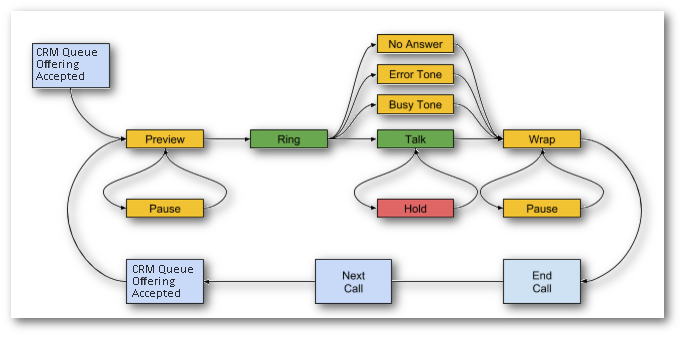
fig 5.1 Auto Dialler with CRM Queues Integration - Call Flow
Offering: When a queue item is offered to the agent a popup window containing the details will appear. The agent can either accept or reject the queue item at this point.
If the agent rejects the queue item the associated phone will be placed in not ready mode and the agent will not receive any further calls until the phone is made ready again.
If the agent accepts the queue item, the CRM entity associated with the item will be displayed in the CRM window of the calltab, and the application will proceed to “Preview” counting down a preconfigured number of seconds before the entity is dialled.
Preview: Preview time allows the agent to get familiar with the details of the forthcoming call. In Dynamics Telephony, preview time is set to 20 seconds by default, but this value along with other dialler settings can be changed in the Dynamics Telephony Administrator's Manual. The application will count down the preview time, displayed on the toolbar Call Timer. When the countdown reaches 0, the call will be dialled and the “Ring” stage begins.
Ring: Once the call is dialled a countdown timer to wait for the call to answer begins (Default 30 seconds). If the call is not answered during this countdown, the dialler will release the call and set a “no answer” outcome against it and the call flow will proceed to the next stage. If the called number is busy, the call will not proceed and a “busy” outcome will be set and the call flow will proceed as above. If the called number results in an Error on Dial tone, the call will set a “eod” outcome and proceed above. If the call is answered within the no answer time, the all will proceed to the “Talk” stage.
Talk: Once the call is connected the talk stage begins. The agent and client will converse and eventually the call will end, which will put the call in the “Wrap” stage.
Wrap: Once the call is finished, the application gives some time to the agent to finish the work at hand (updating / creating entities, notes etc…). By default wrap time is set to 30 seconds. Once the wrap countdown is completed, the call is ended and the application will write its own records, look for the next call in the queue and start the next call by putting it in the “preview” stage, and the cycle continues.
Pause / Hold: As is shown above there are some other stages that may or may not be used. During the Preview and Wrap stages an agent may click the play / pause button on the toolbar to enter the “Pause” stage until such time as the agent is ready to proceed (by clicking the button again). Also during the talk stage, an agent may place a call on hold (“Hold” stage) if required before resuming to the “Talk” stage. These are optional stages that an Agent may use when more familiar with the application.
fig 5.2 shows a queue item being offered to an agent. We can see the popout containing the details of the lead being offered in this instance, along with the regarding object. We have 2 buttons available at this stage Accept or Reject.
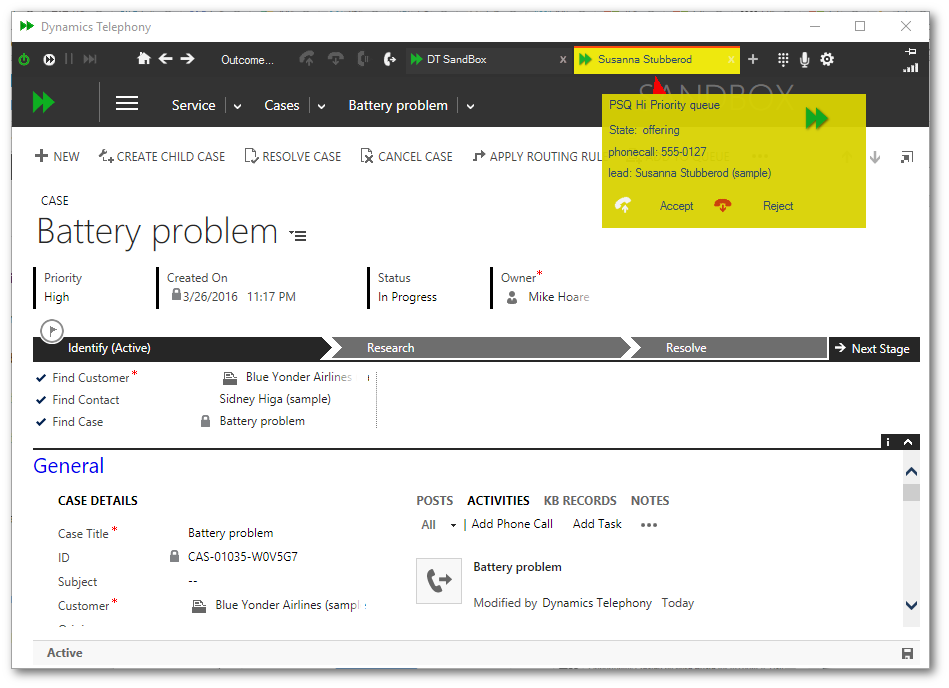
fig 5.2 CRM Queues Integration - Offering
Accepting the queue item will result in the focus switching to this calltab and the lead being displayed in the CRM window (fig 5.3). Notice also the calltab indicator changes to the preview color, the call status text shows “Preview” and the call status timer starts counting down. This is the time for the agent to review the data in the CRM window and get familiar with the information before the call starts dialling.
Once the timer counts down the number will be dialled. In some cases there will be a “busy” or “eod” (Error On Dial) signal and the application will move onto the next contact (with or without wrap time depending on configuration). Most of the time the phone will start ringing.
Once the ringing state begins another countdown timer will begin, the call status text will show “Ringing” and the calltab indicator will change to the ringing color. If the call is not answered by the time the countdown timer runs down, the call will automatically receive a “no answer” outcome and the application will move onto the next queue item (again with or without wrap time depending on configuration). If the call is answered talk time begins. The call status text changes to “Talk”, the call timer starts counting up to measure the talk time and the calltab
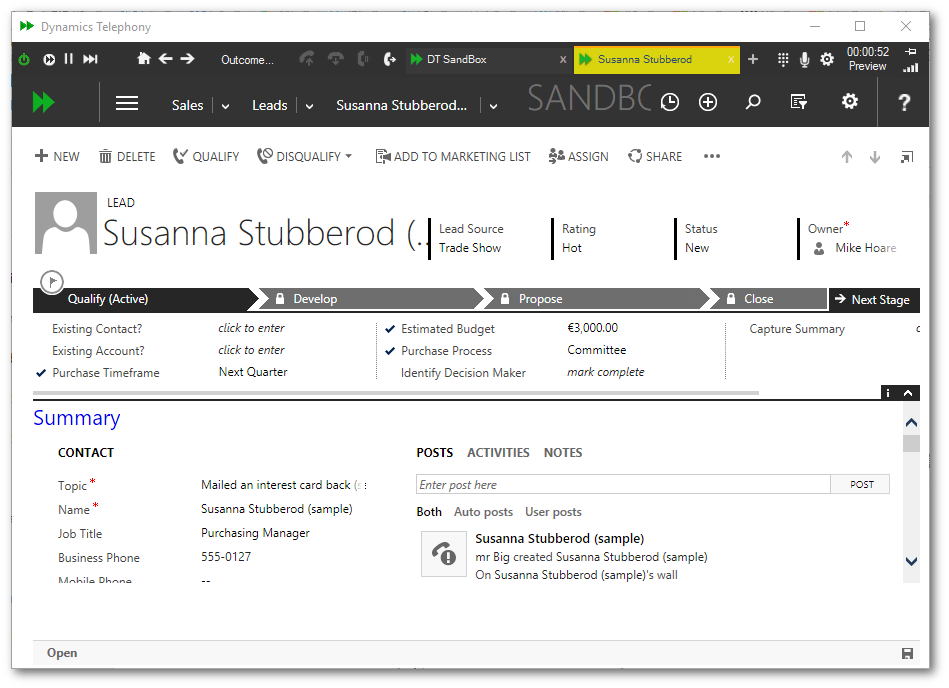
fig 5.3CRM Queues Integration - Preview Time
indicator will change to talk color. The agent can then converse with the other party and do whatever needs to be done in the CRM. Once finished with the call the agent can release the call. This can be down by clicking the release button or depending on configuration selecting an outcome for the call from the outcome popout window. An agent can display the available outcomes by hovering over the outcome button, and can select one by clicking it. Once a call is released, the application may enter wrap time depending on configuration. The time is to allow all data to be entered and checked as complete. Once wrap time begins another countdown timer will begin, the call status text will show “Wrap” and the calltab indicator will change to the wrap color. Agents may press the pause button, as in preview time, if more time is needed to complete and check data entry. At the end of wrap time the details of the call are updated in the CRM and the application will look for another queue item to offer and the cycle continues.
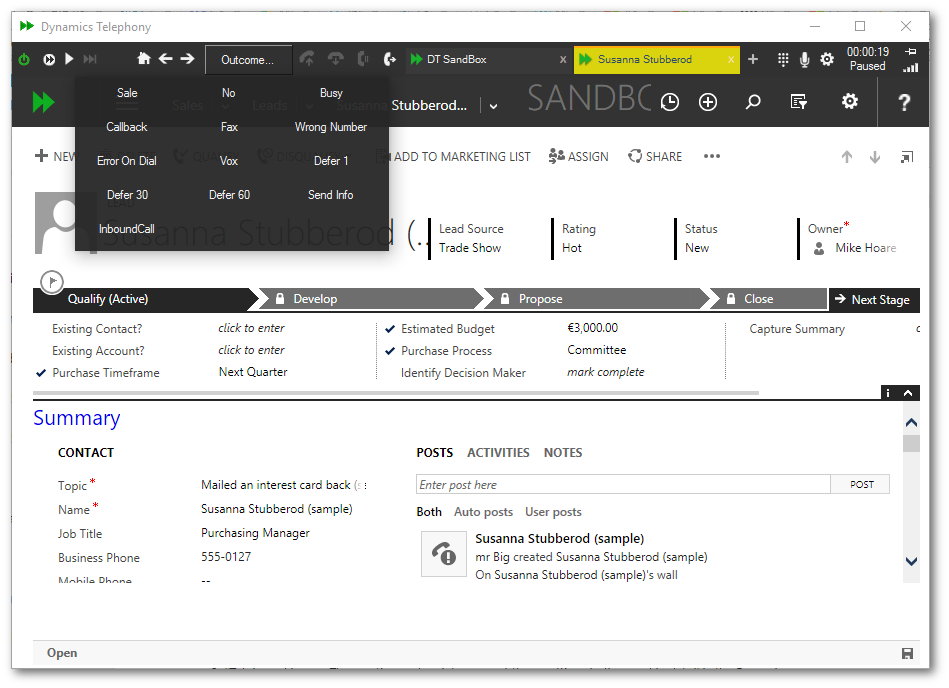
fig 5.4 CRM Queues Integration - Paused in Wrap Time
Chapter 6 - Auto Dialler with Contact Center Outbound Integration (CCOI)
Dynamics Telephony can also integrate with large Call Center Outbound Diallers. In this instance the Contact Center will provide call center contacts to dial and the application will link each call center contact to a CRM entity, display the entity and dial the number given for the contact. The call flow for the auto dialler with contact center integration (shown in fig 6.1) shows each stage during this process. Here is a summary of each stage in the process.
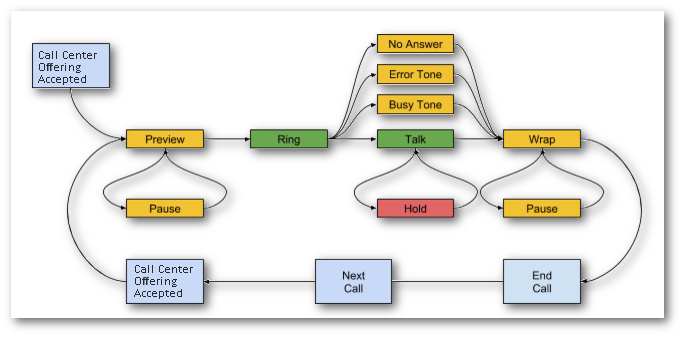
fig 6.1 Auto Dialler with Contact Center Integration - Call Flow
Offering: When a contact is offered to the agent a popup window containing the details will appear. The agent can either accept or reject the contact at this point.
If the agent rejects the contact the associated phone will be placed in not ready mode and the agent will not receive any further calls until the phone is made ready again.
If the agent accepts the contact, the CRM entity associated with the call center contact will be displayed in the CRM window of the calltab, and the application will proceed to “Preview” counting down a preconfigured number of seconds before the entity is dialled.
Preview: Preview time allows the agent to get familiar with the details of the forthcoming call. In Dynamics Telephony, preview time is set to 20 seconds by default, but this value along with other dialler settings can be changed in the Dynamics Telephony Administrator's Manual. The application will count down the preview time, displayed on the toolbar Call Timer. When the countdown reaches 0, the call will be dialled and the “Ring” stage begins.
Ring: Once the call is dialled a countdown timer to wait for the call to answer begins (Default 30 seconds). If the call is not answered during this countdown, the dialler will release the call and set a “no answer” outcome against it and the call flow will proceed to the next stage. If the called number is busy, the call will not proceed and a “busy” outcome will be set and the call flow will proceed as above. If the called number results in an Error on Dial tone, the call will set a “eod” outcome and proceed above. If the call is answered within the no answer time, the all will proceed to the “Talk” stage.
Talk: Once the call is connected the talk stage begins. The agent and client will converse and eventually the call will end, which will put the call in the “Wrap” stage.
Wrap: Once the call is finished, the application gives some time to the agent to finish the work at hand (updating / creating entities, notes etc…). By default wrap time is set to 30 seconds. Once the wrap countdown is completed, the call is ended and the application will write its own records, look for the next call in the queue and start the next call by putting it in the “preview” stage, and the cycle continues.
Pause / Hold: As is shown above there are some other stages that may or may not be used. During the Preview and Wrap stages an agent may click the play / pause button on the toolbar to enter the “Pause” stage until such time as the agent is ready to proceed (by clicking the button again). Also during the talk stage, an agent may place a call on hold (“Hold” stage) if required before resuming to the “Talk” stage. These are optional stages that an Agent may use when more familiar with the application.
fig 6.2 shows a contact being offered by the call center. We can see the popout containing the details of the lead being offered in this instance, along with the regarding object. We have 2 buttons available at this stage Accept or Reject.
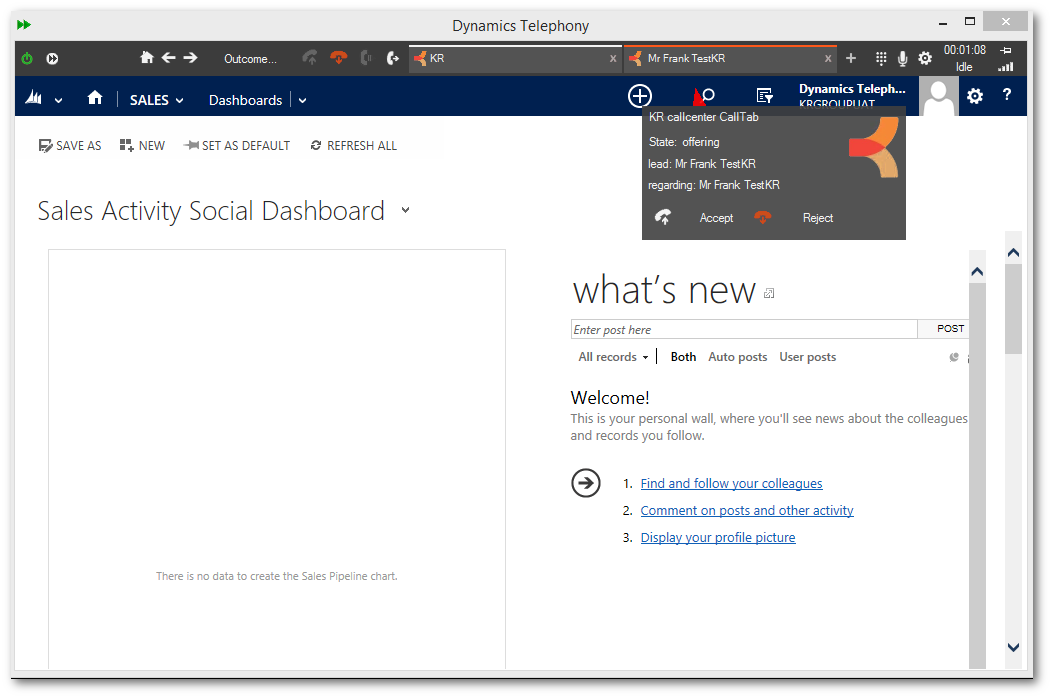
fig 6.2 Contact Center Integration - Offering
Accepting the contact will result in the focus switching to this calltab and the lead being displayed in the CRM window (fig 6.3). Notice also the calltab indicator changes to the preview color, the call status text shows “Preview” and the call status timer starts counting down. This is the time for the agent to review the data in the CRM window and get familiar with the information before the call starts dialling.
Once the timer counts down the number will be dialled. In some cases there will be a “busy” or “eod” (Error On Dial) signal and the application will move onto the next contact (with or without wrap time depending on configuration). Most of the time the phone will start ringing.
Once the ringing state begins another countdown timer will begin, the call status text will show “Ringing” and the calltab indicator will change to the ringing color. If the call is not answered by the time the countdown timer runs down, the call will automatically receive a “no answer” outcome and the application will move onto the next contact (again with or without wrap time depending on configuration). If the call is answered talk time begins. The call status text changes to “Talk”, the call timer starts counting up to measure the talk time and the calltab
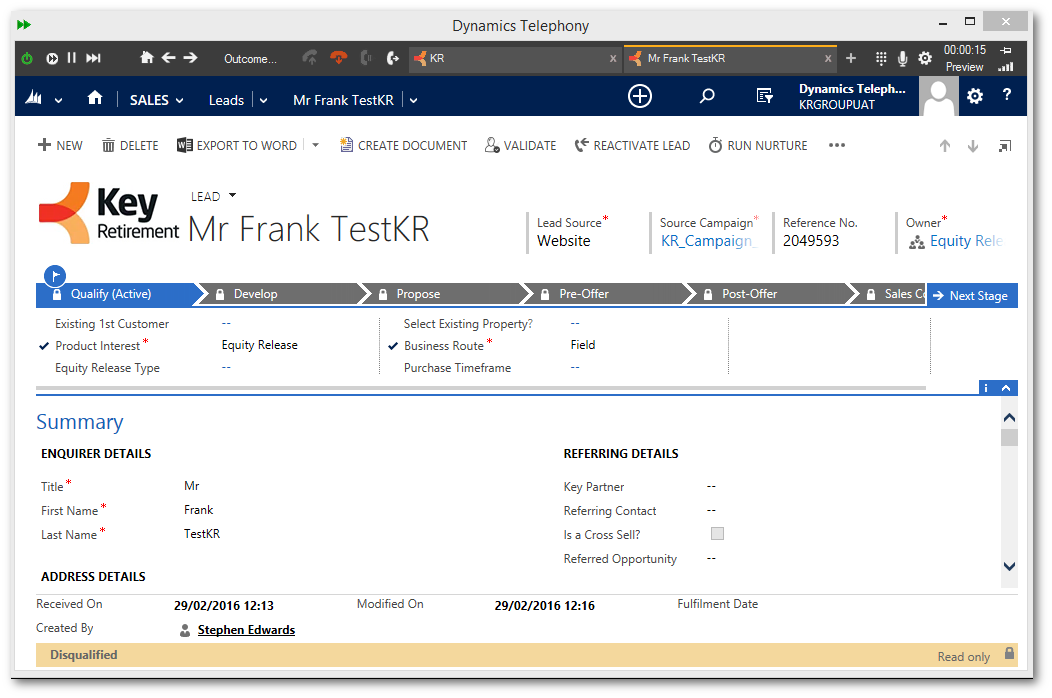
fig 6.3 Contact Center Integration - Preview Time
indicator will change to talk color. The agent can then converse with the other party and do whatever needs to be done in the CRM. Once finished with the call the agent can release the call. This can be down by clicking the release button or depending on configuration selecting an outcome for the call from the outcome popout window. An agent can display the available outcomes by hovering over the outcome button, and can select one by clicking it. Once a call is released, the application may enter wrap time depending on configuration. The time is to allow all data to be entered and checked as complete. Once wrap time begins another countdown timer will begin, the call status text will show “Wrap” and the calltab indicator will change to the wrap color. Agents may press the pause button, as in preview time, if more time is needed to complete and check data entry. At the end of wrap time the details of the call are updated in the CRM and the agent indicates availability to the contact center for another offer and the cycle continues.
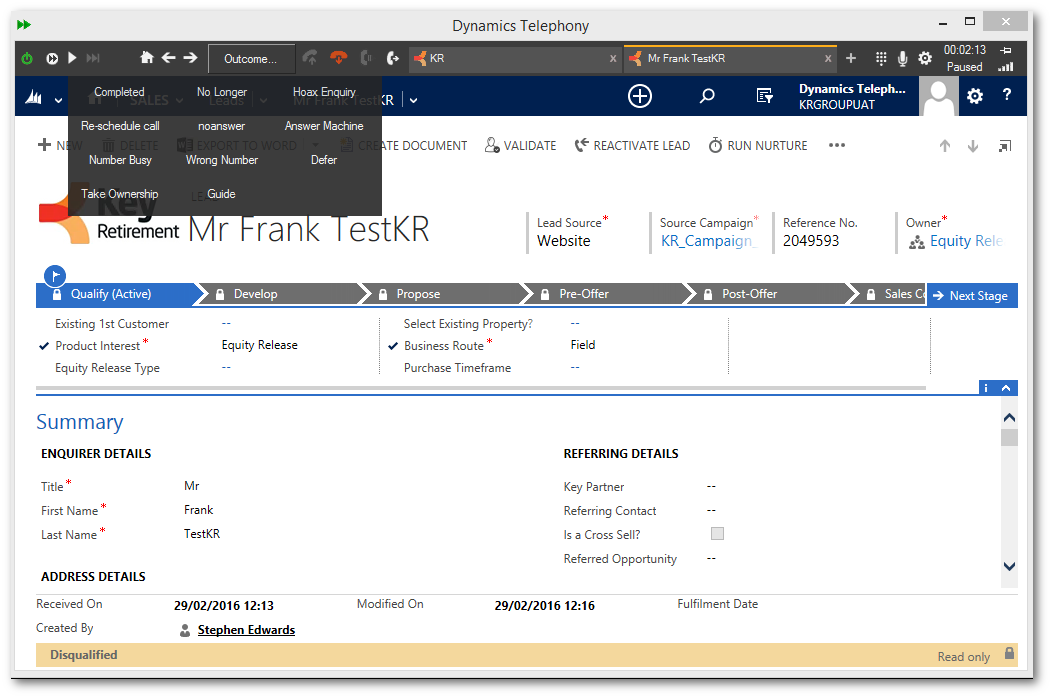
fig 6.4 Contact Center Integration - Paused in Wrap Time
Chapter 7 - Multi Tenancy
Dynamics Telephony supports “Multi Tenancy” where more that one CRM instance can be handled within the application. Typically Supervisors or Administrators will maintain these Linked CRM’s. The only difference end users will normally only notice is that different CallTabs will have different colors and logos reflected that CRM that that CallTab is working on. The creation and maintenance of these settings is discussed in detail in the Dynamics Telephony Administrator's Manual.
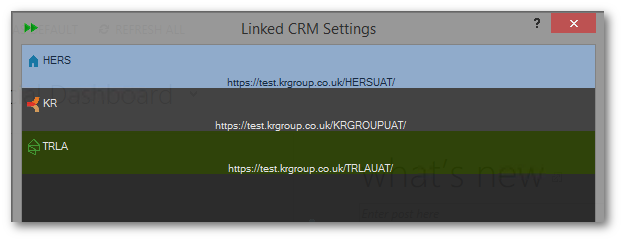
fig 7.1 Multi Tenancy - Linked CRM Settings
7.1 Manually Adding a CallTab
To see what, if any, Linked CRM’s are configured, hover over the “+” button at the right of the CallTab strip. A popup list of available linked CRM’s will appear. To create a new CallTab, select the CRM required and click on it (fig 7.2). A new color coded call tab will be created (fig 7.3). After creating the new CallTab, Clicking on it will display CRM home page for the CRM selected from the list. IE different CallTab will display data from different CRM’s. It is important that users recognize what CRM they are working on and should always take the time necessary to re-familiarise themselves with the page at hand after switching between Calltabs.

fig 7.2 Multi Tenancy - Available Linked CRM’s
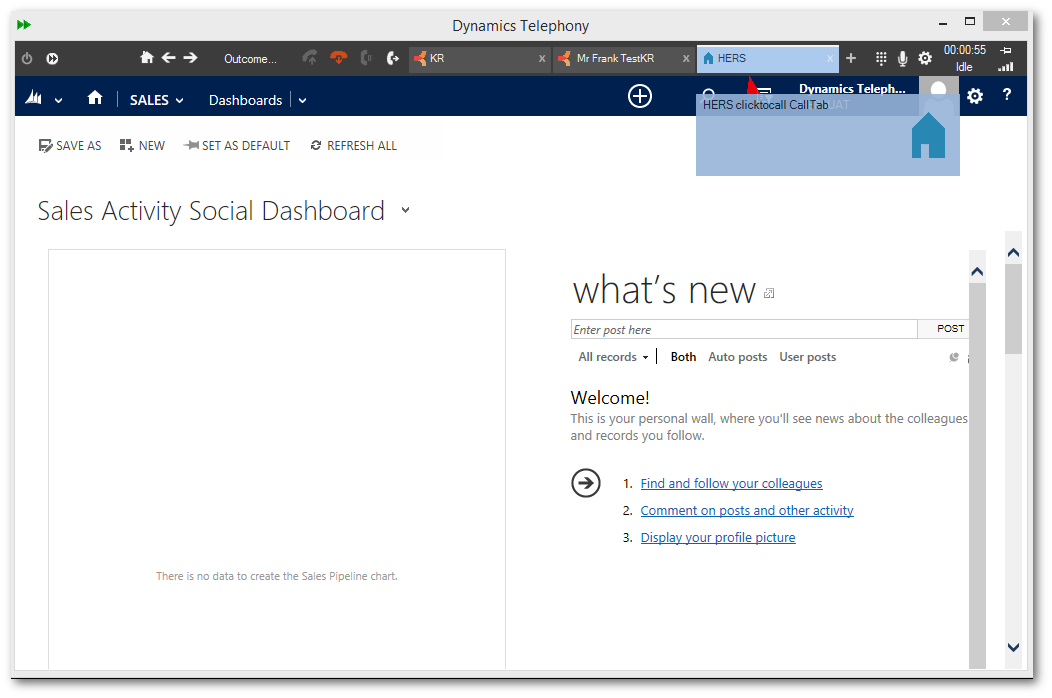
fig 7.3 Multi Tenancy - New CallTab
7.2 Deleting a CallTab
After doing the required work on a page a user can close the CallTab by clicking on the “x” to the right hand side. Once over the “x” it will turn red and clicking on it at this stage will close the CallTab. (fig 7.4 / fig 7.5)
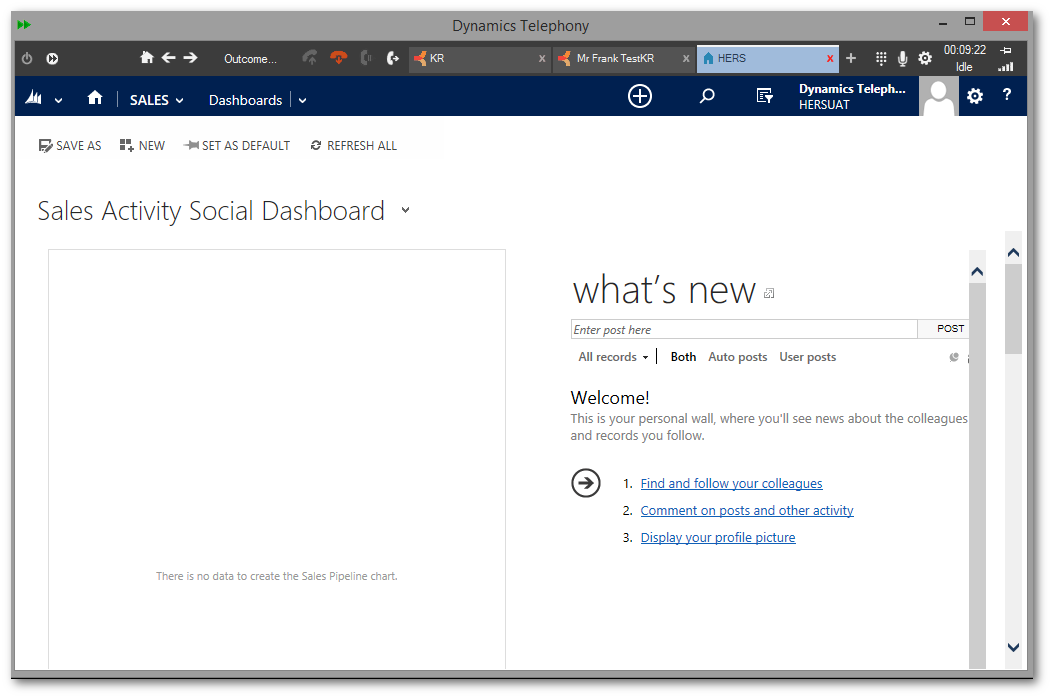
fig 7.4 Multi Tenancy - Close a CallTab
After a moment the CallTab will disappear and the focus will shift to one of the remaining tabs. It is important that users maintain a reasonable number of active CallTabs and not let them accumulate to the point whereby the system runs low on memory. The system will warn in this case, but best practise is to delete the CallTab when finished with it.
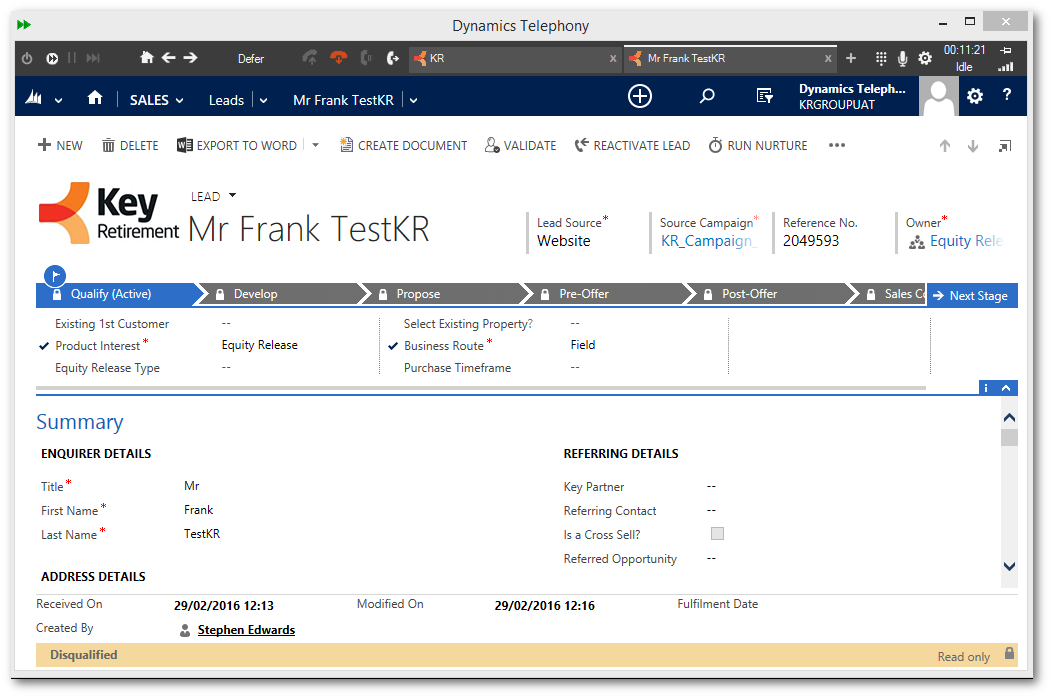
fig 7.5 Multi Tenancy - Closing a CallTab
7.3 Multi Tenancy - Inbound Screen Pop
Multi Tenancy Inbound Screen Pop works much the same way as regular inbound screen pop except that it will rely on DNIS (see section 3.4 above) to pop different CRM instances depending on the number dialled by caller.
Dynamics Telephony Multi Tenancy allows supervisors / administrators to set up a list of DNIS numbers and matching CRM instances. As with the CRM list described above, these are color coded with a logo and a label description. In most cases these will be made to match the linked CRM entry and may only differ in that the label may contain the actual DNIS number or a description to help the agent identify the probable purpose of the call. The creation and maintenance of these settings is discussed in detail in the Dynamics Telephony Administrator's Manual and the agents need only familiarize themselves with the color, logo and label for each DNIS entry.
When a new inbound call comes into the agent, Dynamics Telephony will lookup the calls DNIS number against the list of DNIS numbers configured. If it finds a match, the application will use the colors, logo, label text and CRM instance from the match to create a new CallTab (see fig 7.6). If no match is found, the default CRM instance is used.
The only difference between between this call and the calls described in chapter 3 - Inbound Screen Pop, is the application will display data from another CRM inside the CallTab window and the CallTab is color coded to reflect this. The following example demonstrates this.
An Inbound call finds a DNIS match and creates a new CallTab based on that match…

fig 7.6 Multi Tenancy - Inbound Screen Pop with DNIS - Incoming
The Agent answers the call as usual and carries on working as normal, noting the CRM instance being worked on...

fig 7.7 - Multi Tenancy - Inbound Screen Pop with DNIS - Talk
Once finished with the call the agent can update the CRM etc… When finished, hover over the “x” button at the right hand side of the calltab to close...
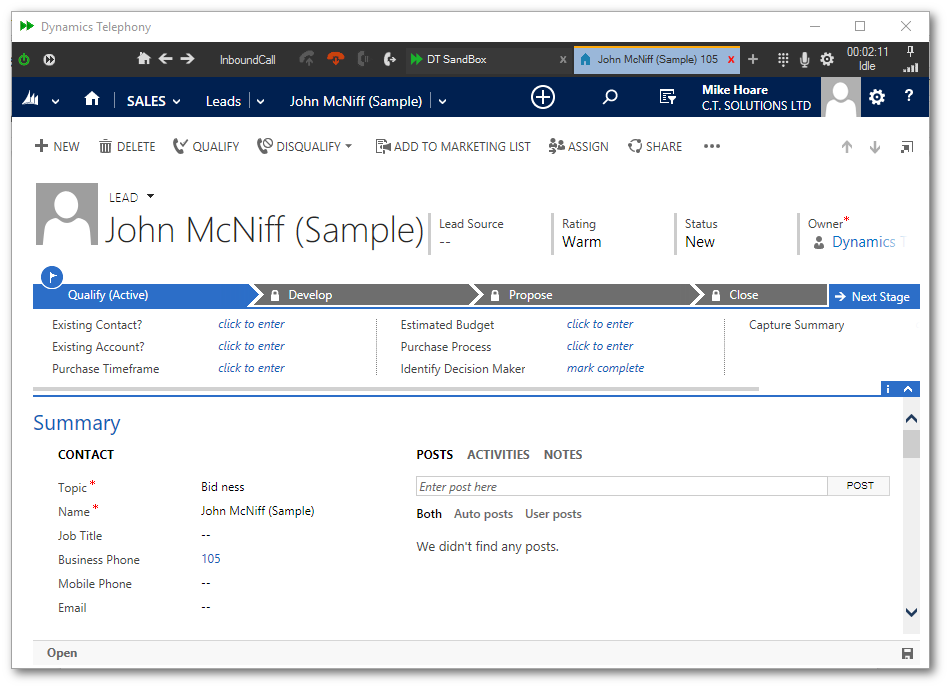
fig 7.8 - Multi Tenancy - Inbound Screen Pop with DNIS - Idle - Before Close
Clicking “x” closes the calltab and we are back where we started...
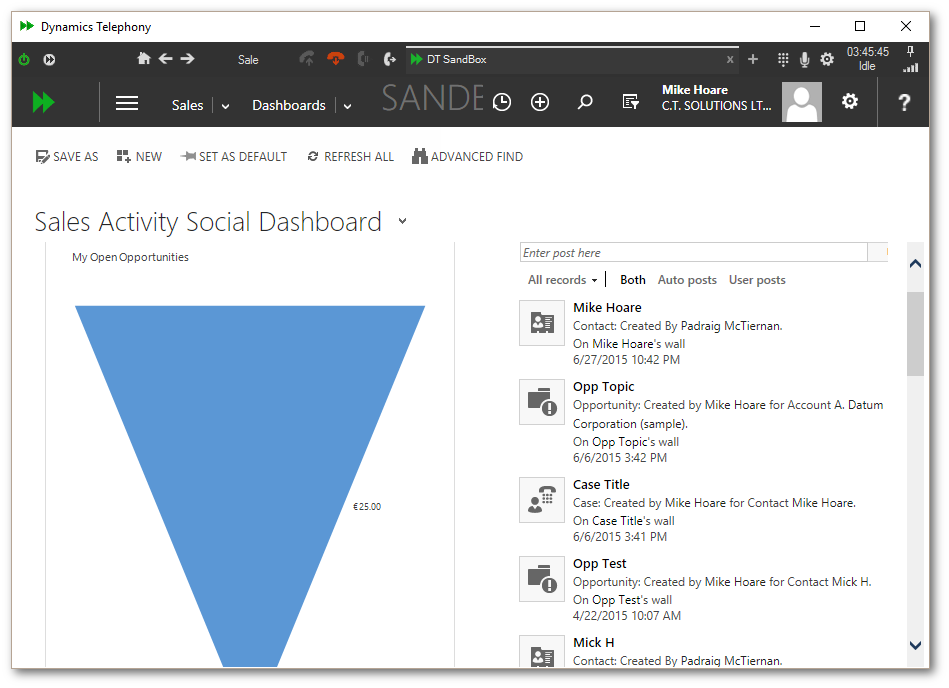
fig 7.9 - Multi Tenancy - Inbound Screen Pop with DNIS - After Close
7.4 Multi Tenancy - Auto Dialler
From an agent’s point of view, the Multi Tenancy Auto Dialler works the same as non multi tenancy, except that the presented entities can come from differing CRM’s and as such with different colors and logos in a manner similar to fig 7.6 in the Inbound Screen Pop section above. It is important that agents using multi tenancy make themselves familiar with the configured CRM’s and their colors and logos so as to be inherently aware of the CRM they are working on at any given time.
7.5 Multi Tenancy - CRM Queues Integration (MT-CRMQs)
From an agent’s point of view, MT-CRMQs works the same as normal CRMQs, except that the offered calltabs and popouts come from differing CRM’s and as such with different colors and logos in a manner similar to fig 7.6 in the Inbound Screen Pop section above. It is important that agents using multi tenancy make themselves familiar with the configured CRM’s and their colors and logos so as to be inherently aware of the CRM they are working on at any given time.
7.6 Multi Tenancy - Contact Center Outbound Integration (MT-CCOI)
From an agent’s point of view, MT-CCOI works the same as normal CCOI, except that the offered calltabs and popouts come from differing CRM’s and as such with different colors and logos in a manner similar to fig 7.6 in the Inbound Screen Pop section above. It is important that agents using multi tenancy make themselves familiar with the configured CRM’s and their colors and logos so as to be inherently aware of the CRM they are working on at any given time.